Master the Basics of JavaScript in one post
Do you want to get started with the basics of JavaScript and get your feet into web development? In this post, you will learn about JavaScript and how you can use it to create dynamic websites or applications!
We will first have a look at JavaScript and where you can use it. Afterward, you learn the basic concepts of JavaScript and how to use it to interact with HTML. The concepts include some programming fundamentals and a short introduction to the DOM that enables us to modify the HTML.
What is JavaScript?
JavaScript is a programming language that enables you to create different types of applications and websites. In this case, an application can include everything from a calculator to a complex video game!
In the field of Web-Development, you can use JavaScript for different types of tasks. For the frontend and the backend. The frontend itself is the part of the application the user can see, for example, the website. On the other hand, the backend is the stuff the user cannot see, for example, the process of storing data inside of a database.
Static vs. Dynamic Webpages
You need to use JavaScript to create dynamic content in the frontend of your website or application. For a better understanding, we first need to know the difference between static and dynamic web pages.
- Static: A website that is displayed exactly as defined in the HTML and CSS!
- Dynamic: A website where existing HTML elements are modified and thus it has changing the content!
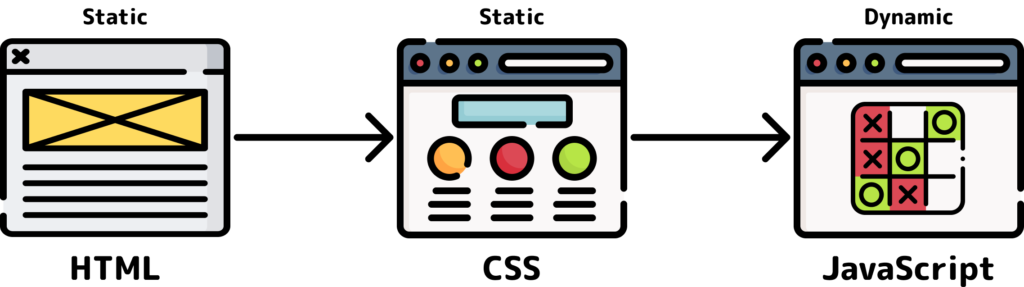
Basics of HTML, CSS and JavaScript working together
In this post, we will only have a look at the frontend or client-side usage of JavaScript, and in a later post, we will also have a look at the backend component. In the case of the frontend, JavaScript is one of the three essential components HTML, CSS, and JS.
- HTML: Defines the structure of the webpage
- CSS: Defines the visuals of the webpage
- JavaScript: Defines the behavior of the webpage
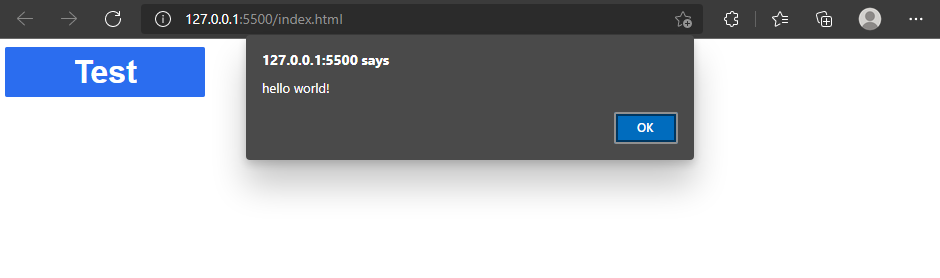
In this example, you can see how the three technologies work together. First, we create the button:
If this guide is helpful to you and you like what I do, please support me with a coffee!
<button class="alert-button" onclick="alertMessage()">Alert me!</button>Then we define the style inside of the “alert-button” class:
.alert-button {
  width: 200px;
  height: 50px;
  background-color: #2b6def;

  font-size: 2em;
  font-weight: bold;
  color: white;

  border: none;
}
And then, we call the function defined in JavaScript.
function alertMessage() {
  alert("hello world!")
}
As a result, an alert pops up when we press the button.
JavaScript’s type safety
An important thing to know about JavaScript is that it is not a type-safe language, which means the type variable is assigned dynamically. For example, the type of a number is an integer.
Although you don’t have to define the types yourself, it is crucial to understand them to reduce errors created by using the wrong types in specific cases. Thus I made a list of the most important data types here.
[convertkit form=2634876]
Programming Basics in Javascript
Variables in JavaScript
Variables store different types of data. The data can be everything, and it includes numbers, strings, arrays, and functions, which we will have a closer look at next.
You have to create a variable before using it, and you create a new variable by using “var”, “let”, or “const” followed by the name of the variable like this:
let value1You use var, let, and const in different scenarios:
- var: Declared variable can be updated and redeclared within its scope
- let: Declared variable can be updated, but not redeclared within its scope
- const: Constant value that cannot change after the first assignment
The possibility of a declaration within its scope causes some problems, and thus “let” is the preferred way of declaring variables. To better understand the difference between “var” and “let”, check out this post. However, in the beginning, this is not super important, and you should use the one you are more comfortable with.
You can assign a value to the already created variable by writing the variable name followed by a “=” and lastly, the value to set (You can also create a variable and assign a value in one step):
value1 = 1Later you can recall the value by writing the variable name in any equation, function, or assignment. For example, you can create a new variable by calling the last one and adding something to it:
let value2 = value1 + 5Functions in JavaScript
Functions combine multiple actions. Thus, a function is similar to a cooking recipe, where all the steps to your perfect cake are defined. The benefit is that you can extract multiple lines that you execute more often from your code and exchange these by just calling the function.
Inside of functions, there are two fundamental characteristics: input parameters and return values. To better understand these two, we will slowly modify the following function, which adds the values 1 + 1 and writes the result to the console (we will have a closer look at the console later).
function add() {
  let sum = 1 + 1
  console.log(sum)
}

add()
First, we declare the function, and then we call it.
Input parameters
Input parameters help us create more dynamic functions, where we can give the function values to use as variables in the executed lines. As an example, and for better understanding, we modify our add function to not always add the values 1+1 by creating two input parameters for both values:
function add(value1, value2) {
  let sum = value1 + value2
  console.log(sum)
}

add(1, 1)
Return Values
Lastly, returning values is important because we can modify values and then use the function to assign a new value to a variable. In our example, we can use “return” to give back the sum of the values and then assign this to a new variable.
function add(value1, value2) {
  return value1 + value2
}

let sum = add(1, 1)
console.log(sum)
We now extracted the console.log statement from the function because its task is only to add the two values and not to print them. Thus, the new function is now reusable, and we could add all our numbers with that function!
Comments in JavaScript
Comments are an essential part of programming, although often underestimated when beginning to code. With comments, you can describe the idea behind a specific part of your code and thus make it better understandable first for yourself and second for other people.
In JavaScript, you can create comments in the following two ways:
// a one line comment

/* a multi line
   comment
*/
Interaction with HTML
In frontend JavaScript, the interaction of JavaScript with HTML is necessary to create a dynamic webpage. Inside the JavaScript, you first select an HTML element and then modify any aspect of it. You can also create or delete any element.
All this is possible through the DOM. The DOM is an Object Model for HTML and it defines the elements as objects and thus also defines the properties, methods, and events of the objects. On the other hand, it is also an API for JavaScript that allows you to interact with the objects!
The HTML DOM is a standard for how to get, change, add, or delete HTML elements
W3Schools
Select HTML elements with JavaScript
With the DOM, you get different methods to interact with JavaScript. To modify them at a later point, you can store the elements themselves inside of a variable.
- getElementById: uses the id attribute of your html elements to select exactly one element
- getElementsByTagName: uses the element name itself to select all elements
- getElementsByClassName: uses the class attribute of an element, to select all elements with that class
- querySelector: uses CSS selectors to select the first matching element (See the CSS selectors here)
- querySelectorAll: uses CSS selectors to select all matching elements
Modify HTML elements with Javascript
After selecting the elements you want to modify, you can do that with the following functions:
- <element>.innerHTML: Change the inner HTML of an element (i.e. the text of a heading)
- <element>.<attribute>: Change the attribute value of an element (i.e. the id of an element)
- <element>.setAttribute(<attribute>, value): Change the attribute value of an element with a function (i.e. the id of an element)
- document.createElement(element): Create a new element, to make it visible assign it to another element with addChild
- <element>.addChild(element): Adds element as the child of another element
- <element>.removeChild(element): Removes child of another element
For the createElement function, the document is needed. The document is your webpage in its entirety, and it contains multiple methods that elements do not possess. To get a better understanding of the document itself, check out this post.
Integrate JavaScript into HTML
Now that you learned all the basics of JavaScript, there is only one question left. How do you use JavaScript inside of the HTML? Similar to the CSS post, there are two ways to include JavaScript, but only one is recommended.
Internal JavaScript
You can create internal JavaScript in the HTML head or body inside of a “script” element. Sadly, this method is not recommended because it makes it harder to maintain your code across multiple HTML files.
<head>
  <script>
    ...
  </script>
</head>
<body>

  <script>
    ...
  </script>
</body>
External JavaScript
Lastly, with the external JavaScript, we define it inside a JS file and then import it into the HTML head or body. External JavaScript is the best practice because you can create multiple JS files, maintain the logic easier and use it in different HTML files and projects!
<head>
  <script src="/path/to/code.js"></script>
</head>
<body>

  <script src="/path/to/code.js"></script>
</body>
If you want to learn about some of the pitfalls and more detailed information on how to import javascript the right way, check out this post.
Basics of Browser Dev Tools for HTML, CSS and JavaScript
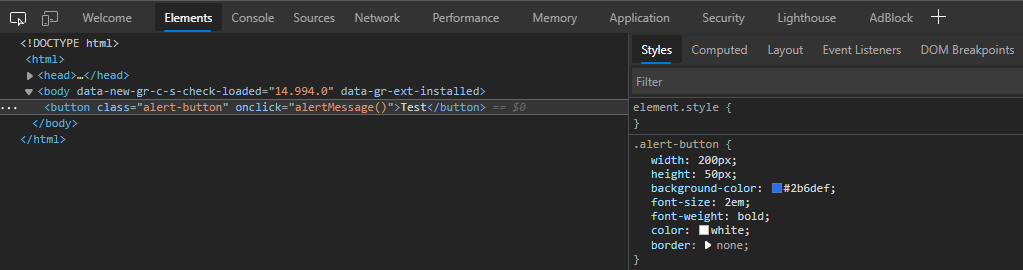
Lastly, we will have a look at the browser dev tools. They help you find problems with your HTML, CSS, or JS and let you try different approaches without changing your current state. To do that, they include multiple different tools, but for now, the “Elements” and “Console” tabs are important for you.
Elements (HTML and CSS)
The elements tab shows you the HTML and CSS of the current website. In there, you can inspect and modify each element and also each style. If you change something in this tab, you will see the changes on the site immediately, but to save it, you have to transfer it to your files.
Additionally, it shows an excellent graphic for the box model and lets you understand it for each element.
Console (JavaScript)
The console, on the other hand, displays messages you log with, for example, console.log. Thus, it is beneficial for finding problems, and it also includes a filter to show specific messages.

Additionally, you can also write JavaScript code and try it out. As a simple example try to write:
console.log("hello world")and then you see the executed and displayed code in the console.
Concluding the Basics of JavaScript
In this post, we learned the basics of JavaScript. First, we had a look at what JavaScript is and how to combine it with HTML and CSS, that learned about in the last posts. After that, we had a look at some programming fundamentals like variables, functions, and comments. These were followed by some basics on how to interact and modify HTML elements with JavaScript. Lastly, we learned how to include JavaScript in your HTML.
As a bonus, we looked at the Browser Dev tools, and which are important for beginners.
Now it’s your turn! Start your first project including HTML, CSS, and JavaScript. What will it be? Tell me in the comments!
I hope you learned a lot from this post and got started with JavaScript. In case you have any feedback or questions, leave a comment or send me an email at mail@programonaut.com.
Additionally, if you want to learn more about HTML, CSS, and JS, definitely subscribe to my newsletter and get updated on my new posts.
[convertkit form=2303042]
Discussion (0)
Related Posts