Master the Basics of CSS in one Post
Learning the basics of CSS is one of the first steps in becoming a Web Developer! This post will give you a basic understanding of styling websites with CSS!
We will start with a short overview of CSS and then dive into the basic concepts!
What is CSS?
CSS describes the visuals of different HTML elements in various media. You can define the styles for multiple web pages at once and reduce the amount of work. You can define styles in different places, such as in external stylesheets that end with .css or inside the HTML file.
In CSS, a style rule consists of a selector that defines which element to change visually and a declaration block that determines how it should look. The declaration block consists of multiple key-value pairs, where the key is the property you want to change (i.e. the color) and the value you want to change it to (i.e. red).

What are CSS Selectors?
As described before, the selector is one of the CSS basics and selects the elements that should be affected by the style changes. There are five different types of selectors, where each type covers a specific use case.
- Basic CSS selectors
- Combinator selectors
- Pseudo-class selectors
- Pseudo-elements selectors
- Attribute selectors
Basic CSS Selectors
The basic selectors are used most frequently, and they are based on HTML elements and some of their attributes.
CSS Element Selector
The element selector is the most basic one and changes the style of the HTML element themselves. With this selector, you define the style for every element of a specific type! (i.e. you change the color of every h1 element in the whole HTML)
If this guide is helpful to you and you like what I do, please support me with a coffee!
h1 {
    color: red;
}
CSS Class Selector
The class selector uses the “class” attribute of every HTML element. You can define multiple classes inside of this attribute, and you can define different styles for each class.
<tag class="large-text red">Some content...</tag> In the CSS, you select the elements with the specified class by using a dot followed by the class name like this: “.name”. So, for the example above, it would look like this:
.large-text {
  font-size: large;
}

.red {
  color: red;
}
CSS ID Selector
Like the class selector, the id selector acts based on the id attribute of HTML elements.
<tag id="content">Some content...</tag> In contrast to classes, it is only possible to have precisely one id in an HTML file. Thus the id selector is only able to select exactly one element with the specified id. To use this selector, you have to follow this schema: “#name”.
#content {
  font-size: large;
  color: red;
}
CSS Universal Selector
One of the fewer used selector types is the universal selector. As the name suggests, it selects all elements inside the HTML and applies the specified style to each element.
* {
  font-size: large;
  color: red;
}
CSS Grouping Selector
Lastly, with the grouping selector, you can combine all of the previously described selectors. It applies one style to multiple selectors at once. To accomplish this, you have to create a comma-separated list of all selectors.
h1, h2, h3 {
  color: red;
}
[convertkit form=2634876]
Combinator Selectors
The combinator selectors are used to select elements based on the relationship between each other. They use the basic selectors from the last section.
To understand the used terms have a look at the following figure:
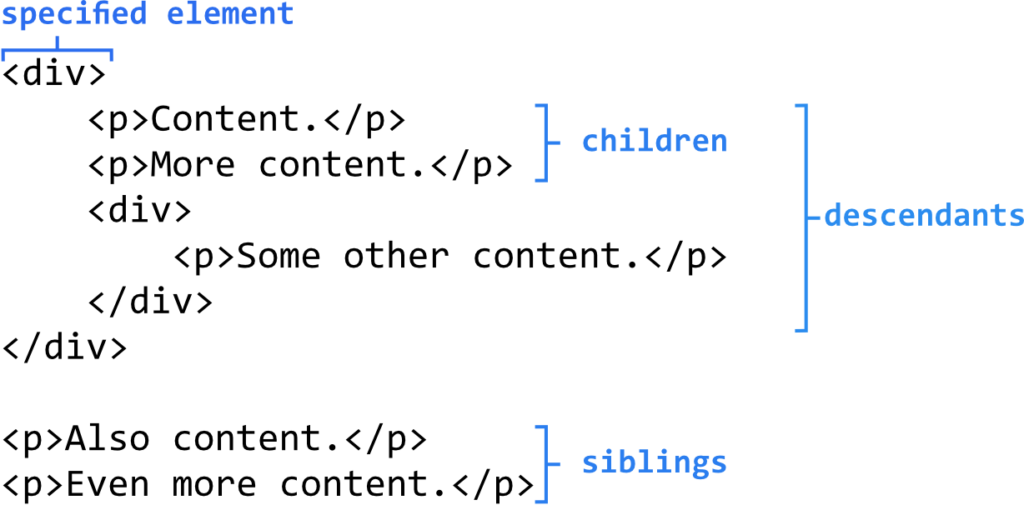
Descendant Selector
The descendant selector selects all elements that are descendants of a specified element. That includes all descendants and is not restricted to the first layer of children.
div p {
  color: red;
}
Child Selector (>)
The child selector selects all children of a specified element. In contrast to the descendant selector, this only includes the first layer of descendants.
div > p {
  color: red;
}
Adjacent Sibling Selector (+)
The adjacent sibling selector only selects the first sibling following a specified element.
div + p {
  color: red;
}
General Sibling Selector (~)
In contrast to the adjacent sibling selector, the general sibling selector selects all siblings following a specified element.
div ~ p {
  color: red;
}
Pseudo-class Selectors
To understand the pseudo-class selectors, we must first understand what a pseudo-class is and why it is beneficial. In short, a pseudo-class defines a particular state of an element. For example, the hover state is active while your mouse is on top of an element.
The syntax for the pseudo-class selector is as follows:
selector:pseudo-class {
  property: value;
}
A practical example for this is changing the text color for a link during the hover state:
a:hover {
  color: green;
}
To get a list of all the pseudo-classes for the different elements, have a look here.
Pseudo-elements Selectors
In contrast to the pseudo-class, the pseudo-elements don’t represent a state but a specific part of an element. Thus, the selectors can style only the first letter of a text, for example.
The syntax for the pseudo-element selector is as follows:
selector::pseudo-element {
  property: value;
}
And a practical example is the styling of only the first letter in a paragraph:
p::first-letter {
  font-size: xx-large;
}
Attribute Selectors
With the attribute selector, it is possible to select elements based on attributes and the values of the attributes. Attributes are specified in the start tag and define a specific behavior of an HTML element, as described in my last post here.
The following list displays all ways to use the attribute selectors with this syntax:
(selector)[attribute-selector] {}With the “(selector)” being optional.
- [attribute]: select elements with a specific attribute
- [attribute=”value”]: select elements with a specific attribute and value
- [attribute~=”value”]: select elements with an attribute value containing a specified word
- [attribute|=”value”]: select elements with the specified attribute starting with the specified value
- [attribute^=”value”]: select elements whose attribute value begins with a specified value
- [attribute$=”value”]: select elements whose attribute value ends with a specified value
- [attribute*=”value”]: select elements whose attribute value contains a specified value
How to integrate CSS?
There are three ways to integrate CSS into your HTML file. Each of the ways works differently and thus has drawbacks and benefits.
Inline Style
The inline styling is applied to each element itself by using the HTML attribute “style”. Although this sounds simple and intuitive, this method is discouraged because it makes maintaining your code a mess.
<p style="color: red">Content.</p>Internal Style
The internal styling is created in the head of an HTML document. Sadly you shouldn’t use this method as well because it makes maintaining the CSS across multiple HTML files a mess.
<head>
    <style>
        p {
            color: red;
        }
    </style>
</head>
External Style
Lastly, we have external styling, where we define the CSS styles inside a CSS file and import that inside the HTML head. External styles are the best practice because you can create multiple CSS files to style your HTML. With that, you can maintain the styles easier and use the same files in different files and projects!
<head>
    <link rel="stylesheet" href="/path/to/style.css">
</head>
The Cascade
The cascade is part of the name CSS and is one of the basics for styling your website. Each property can be overwritten after a specific hierarchy. That means if the importance of the defined style is higher than the already existing style, it will be overwritten. For a better understanding, the hierarchy is listed below:
- External CSS
- Internal CSS overwrites External CSS
- Inline CSS overwrites Internal CSS
Additionally to this order, selectors can also overwrite the values of other selectors. If, for example, I first define the CSS class red, which changes the font color to red, and another class green, which changes the font color to green, the order inside the CSS file matters. Not the order of the classes inside the class attribute.
To summarize, CSS will always use the last defined value for an element. For this also the import order can be important!
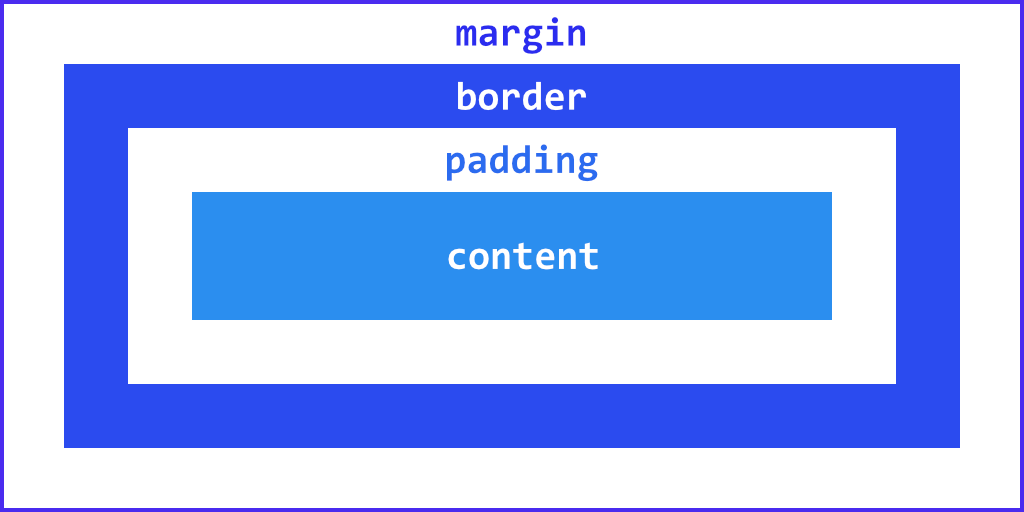
The Box Model
The box model is used when talking about the design and layout of your website and your elements. It’s basically a box that wraps around every HTML element, and it consists of:
- Content – The content of the box
- Padding – Clears (transparent) an area around the content
- Border – A border that goes around the padding and content
- Margin – Clears (transparent) an area outside the border
You can see it in the following image:
Conlusion of the CSS Basics
In this post, we had a look at the basics of CSS, what it is and how to write it. After that, we learned what a selector is and about all the different types there exist. For example, the basic selectors use the element itself, the class, and the id attributes.
In the last section, we had a look at the importance hierarchy and the box model.
I hope you learned a lot from this post and got started with CSS. In case you have any feedback or questions, leave a comment or send me an email at mail@programonaut.com.
Additionally, if you want to learn more about HTML, CSS, and JS, definitely subscribe to my newsletter and get updated on my new posts regarding these topics.
[convertkit form=2303042]
Discussion (0)
Related Posts