How To Monitor A Website For Status Changes For Free
Do you want to monitor a website or web application for status changes and get notified when it is down? In this post, we will look at Upptime, a GitHub-based Monitoring Solution that is free of charge, and you can also monitor multiple sites.
I have been using Upptime for some months now, and I want to present you with my reasons for using it, and I also want to show you how to set it up step-by-step.
- What is Upptime?
- Why or Why not use Upptime?
- How to use Upptime to monitor a website for status changes?
- Conclusion
What is Upptime?
Upptime is an Open-Source uptime monitor that will inform you when one of your endpoints goes down! It is entirely powered by GitHub and GitHub Pages and is completely free to use. You can find the project here.
Why or Why not use Upptime?
Now let’s look at some of the benefits and drawbacks of using Upptime and why I decided to use it. The only two drawbacks I encountered so far are first that you have to give Upptime a Personal Access Token, and as soon as it expires, nothing works anymore (and you get a ton of e-mails for failed workflows), and your repository is updated automatically. The Problem with the automatic update is that they sometimes contain a small bug (therefore, you get a ton of e-mails for failed workflows).
But that’s it. These are all the drawbacks that I have encountered so far (in the last 3 Months). On the other side, Upptime has enormous benefits. First of all, it is free to use and pretty simple to set up. Then it runs on the GitHub Servers, so most likely not on the same server as your Web Applications and Websites. And lastly, you get notifications to your e-mail and your GitHub App when a Website is down.
Overall I recommend everybody to try it out because I think the people behind Upptime build out a really cool concept of using GitHub Actions for the Monitoring of Websites!
How to use Upptime to monitor a website for status changes?
Now that we have heard a bit about the benefits and drawbacks of Upptime and you have probably decided to give it a try, we can start setting it up!
If this guide is helpful to you and you like what I do, please support me with a coffee!
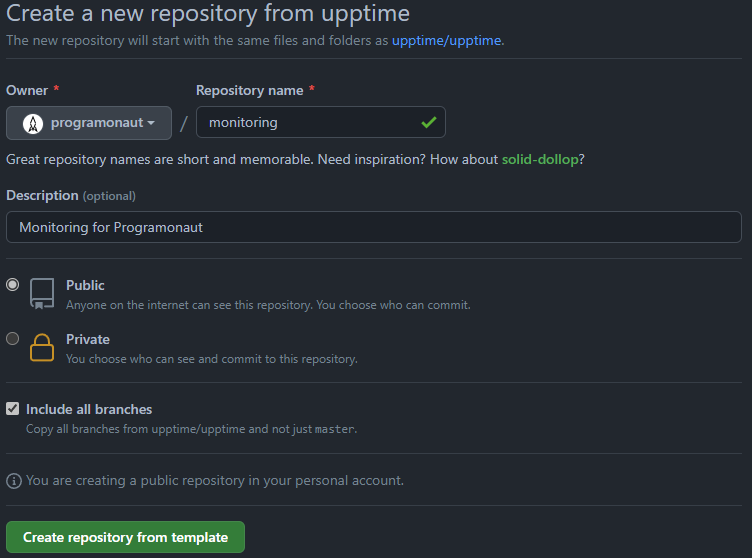
- Visit the Upptime repository here.
- Click on “Use this template”

- Enter a name
- Check “Include all branches”!
- Create the new repository
- Go to “Settings” > “Pages” (do the next steps if needed)
- Under “Source”, change “None” to
gh-pages - In the folder dropdown, select
/(root) - Skip the “Theme Chooser” option
- Click on “Save”
- Under “Source”, change “None” to
- Add secrets (to publish changes to the website via workflows)
- Profile Picture > Settings > Developer Settings > Personal Access Tokens
- Click on “Generate new Token”
- Select “repo” and “workflow” scopes
- Click on “Generate Token”
- Copy the Token
- Open the repository again > Settings > Secrets
- Click on “New repository secret”
- Enter key=GH_PAT and value=copied token
- Click on “Add Secret”
- Update the configuration file (.upptimerc.yml) with your values (explanations are in the comments or here)

Here is an example configuration for my repository:
# Change these first
owner: programonaut # Your GitHub organization or username, where this repository lives
repo: monitoring # The name of this repository

sites:
  - name: Programonaut
    url: https://www.programonaut.com

status-website:
  # Add your custom domain name, or remove the `cname` line if you don't have a domain
  # Uncomment the `baseUrl` line if you don't have a custom domain and add your repo name there
  # cname: demo.upptime.js.org
  baseUrl: /monitoring
  logoUrl: https://raw.githubusercontent.com/upptime/upptime.js.org/master/static/img/icon.svg
  name: Proramonaut Upptime
  introTitle: "**Upptime** is the open-source uptime monitor and status page, powered entirely by GitHub."
  introMessage: This is a sample status page which uses **real-time** data from our [GitHub repository](https://github.com/upptime/upptime). No server required — just GitHub Actions, Issues, and Pages. [**Get your own for free**](https://github.com/upptime/upptime)
  navbar:
    - title: Status
      href: /
    - title: GitHub
      href: https://github.com/$OWNER/$REPO

# Upptime also supports notifications, assigning issues, and more
# See https://upptime.js.org/docs/configuration
After committing the changes to the configuration file, a GitHub Action will be initiated, and your website will be rebuilt. The result for my configuration looks like this:
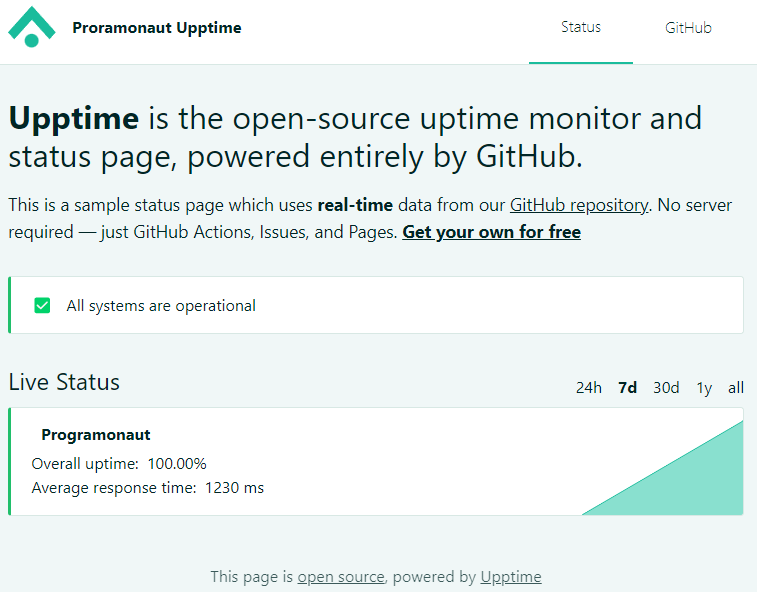
With that, you set up your own monitoring solution, and you are now able to monitor status changes on your website!
Conclusion
Upptime is a really simple and free solution to monitor your websites for status changes! As we saw in the last section setting up this solution is pretty simple and only requires you to have a GitHub Account!
Are you planning to use Upptime? Tell me in the comments why or why not!
If you enjoyed this guide, consider subscribing to my Newsletter. In it I will inform you about all the guides I released in a month.
[convertkit form=2303042]
Discussion (0)
Related Posts