Master the Basics of HTML in one Post
Learning the basics of HTML is one of the first steps in becoming a Web Developer! This post will give you a basic understanding of structuring Websites and what HTML is!
We will start with a short overview of HTML and then immediately dive into the basics!
- What is HTML?
- What is an HTML Element?
- The structure of a basic HTML file
- The most important HTML Elements
- Conclusion of the HTML basics
What is HTML?
HTML is a markup language to define the structure of a website. Generally speaking, markup languages determine a set of elements that control the structure, the relationship, and the formatting of a text document.
In HTML, each element tells the browser what it contains, and the browser knows what to do with it. So, for example, an element can tell that it contains either a heading or an image!
In the beginning, one popular misconception is that you define the visual representation of your website with HTML. This is not the case! Visuals are defined with CSS. I will release another post about the basics of CSS soon and will link to it here!
What is an HTML Element?
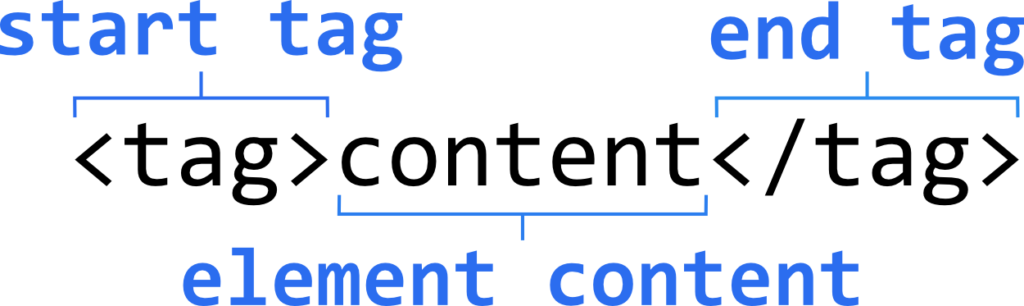
Elements are an essential concept to understand HTML. The browser understands what to do and how to display different elements. The following figure shows that each element consists of a start tag, an end tag, and the content. The content can be a simple text or other elements that build up a hierarchy together!
3 Important things regarding HTML elements
- Don’t forget to close the tag: You have to close an basic element with an end tag!
- Empty HTML elements: Empty elements don’t need content and they arent closed with an end tag.
- HTML tags are not case sensitive: You can write a tag however you want: <TAG> works the same as <tag>
Attributes
Attributes are defined in the start tag of an element and specify its behavior. For example, the “src” attribute specifies the link to an image in the image element.
If this guide is helpful to you and you like what I do, please support me with a coffee!
<img src="/path/to/image.png" />Each element uses different attributes, and you can find a list of all possible attributes here.
Nesting
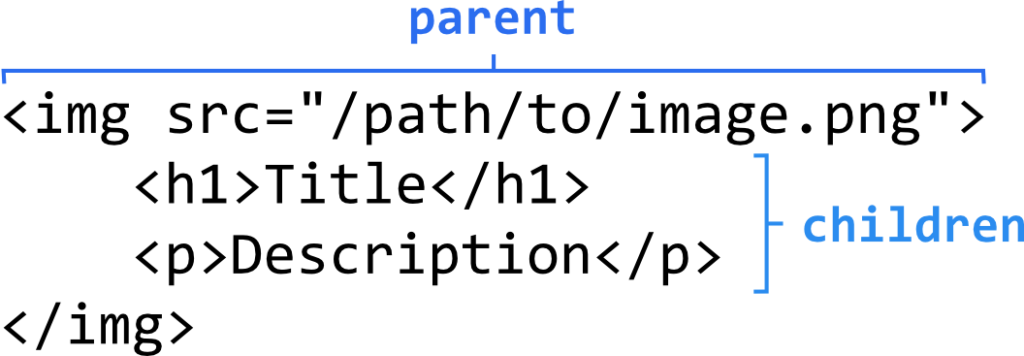
Nesting is the term for an element containing other elements. As a result, you define relationships between multiple elements, and it is often used throughout your website’s structure.
One example of the importance of nesting is an image element with a title and description (HTML itself will not immediately show it on top of the image, to achieve this effect, CSS is needed):
[convertkit form=2634876]
The Structure of a basic HTML file
Every HTML file follows a specific structure, including the following elements:
- <!DOCTYPE html>: Defines that it is an HTML File
- <html>: Defines start and end of the HTML file
- <head>: Contains meta information about the HTML and provides a way to import CSS for styling and JS for interactivity
- <title>: Example for meta information, that specifies the title of the page
- <body>: Contains the elements making up the page
The following code shows the structure of these elements:
<!DOCTYPE html>
<html>
<head>
	<title>Example Webpage</title>
</head>
<body>

</body>
</html>
How to import CSS and JS
CSS is a way to change the visual representation of an element. It can either be specified immediately in the HTML or inside of an external file. I advise you always to write the CSS in an external file if possible. As a result, your HTML is cleaner, and you find errors faster. You import the CSS in the HTML head:
<head>
	<link rel="stylesheet" href="/path/to/style.css">
</head>
JS adds interactivity or changes elements with code. It can also be specified in the HTML, but it makes more sense to keep it in a separate file as well! In contrast to CSS, you import JS files either in the head or the body:
<head>
	<script src="/path/to/code.js"></script>
</head>
<body>

	<script src="/path/to/code.js"></script>
</body>
The most important HTML elements
Headings in HTML
The heading elements create headings and subheadings on your website, for example, to structure a blog post. There are six stages going from <h1> to <h6> with decreasing importance!
<h1>Heading 1</h1>
<h2>Heading 2</h2>
<h3>Heading 3</h3>
<h4>Heading 4</h4>
<h5>Heading 5</h5>
<h6>Heading 6</h6>
Paragraphs in HTML
The paragraph element <p> contains a paragraph of text and always starts in a new line. It ignores linebreaks or big whitespace (starting with 2) and does the formatting for you. To create linebreaks in a <p> element you have to use the empty <br> element.
<p>
I will remove
the line breaks
and      whitespaces
you create
</p>
The second way to create a paragraph of text is with the <pre> element. This tag stands for preformatted text and keeps all the linebreaks and white spaces you make.
<pre>
I will keep
the line breaks
and      whitespaces
you create
</pre>
There are multiple ways to format your text; to learn more about that, check out this post! (coming soon)
Images in HTML
The <img> element is used to embed images in your webpage. The “src” attribute specifies the location of the image. Another important attribute is “alt”, which defines a text displayed for people with disabilities or in case the image is not loaded correctly.
<img src="/path/to/image.png" />The image element is one of the few empty elements. That is why it can be created like shown above or with a start and an end tag.
Links in HTML
Link elements direct the user to a different spot on your website or a completely different one. Therefore you specify the target URL in the “href” attribute of the <a> element.
<a href="url">clickable text</a>The anchor element also provides a way to open an email program with the specified email address in the “href” attribute by specifying it like this:
<a href="mailto:mail@example.com">send to this email</a>Divs in HTML
The <div> element is super versatile and can create different sections in your HTML. The element itself does not change the looks or structure of the visible website but is used as a container for your HTML elements. Later it is essential to style and manipulated the contained children with CSS and JS.
<div>
	<tag1></tag1>
	<tag2></tag2>
</div>
Conclusion of the HTML basics
In this post, we started learning the basics of HTML with a short Introduction about what HTML even is, followed by an explanation of the most crucial concept: elements. An element consists of a start tag, an end tag, some content, and attributes specified in the start tag to recapitulate.
We then defined the basic structure of every HTML file, consisting of the HTML container and the head and the body. We then learned that we can import CSS only in the head and JS in both the head and the HTML body!
Lastly, we had a short overview of the most important HTML elements to create the basic structure of your website.
I hope you learned a lot from this post and got started with HTML. In case you have any feedback or questions, leave a comment or send me an email at mail@programonaut.com.
Additionally, if you want to learn more about HTML, CSS, and JS, definitely subscribe to my newsletter and get updated on my new posts regarding these topics.
Lastly, in the next post, we will look at the basics of CSS!
[convertkit form=2303042]
Discussion (0)
Related Posts