How To Create Realtime Chat Application using Pocketbase
Are you looking to add realtime functionality to your chat application? Then Pocketbase can help! It makes it easy to build realtime applications, for example, to allow users to communicate. So, in this blog post, we’ll learn how to create a realtime chat application using Pocketbase and Svelte. Let’s get started!
- Create the Pocketbase tables with realtime functionality
- Extend svelte application with routing
- Create chats in pocketbase and show them in realtime
- Create messages in pocketbase and show them in realtime
- Conclusion
This post is based on the login system created in the previous one. You can find it here. In it, we created the pocketbase project and a login screen supporting user creation and authentication. We will use it in this post to assign chats and messages to different users. Thus, I suggest reading the previous post before continuing with this one.
Create the Pocketbase tables with realtime functionality
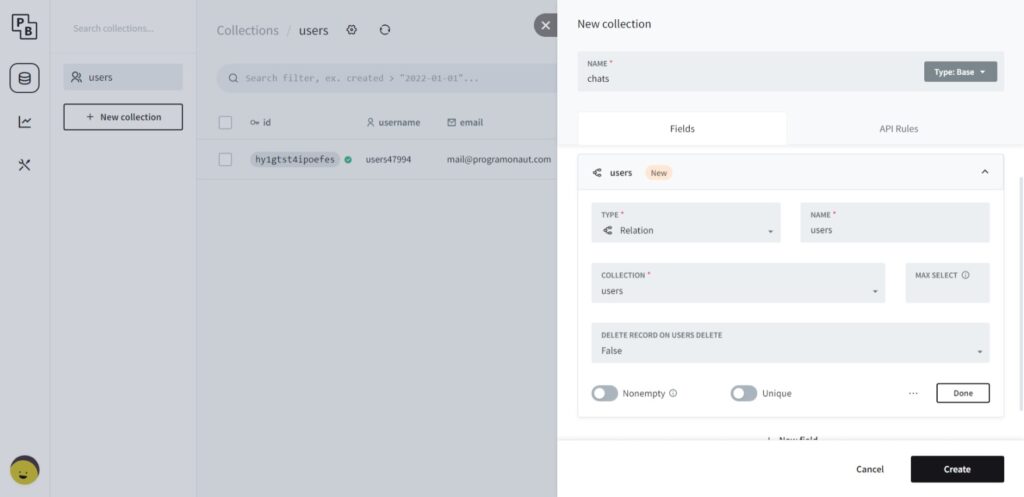
To create the chat app functionality, we need two different tables. The tables are chats (users -> relation to users (max select empty)) and messages (chat_id: relation to chats (max select 1), author_id: relation to users (max select 1), and content: text), where a relation connects two tables. You can create a table by going to your pocketbase instance and then “Collections” > “New collection”. To create a relation, first, select the relation type and then choose the table. For example, the final table definition for chats looks like this (set MAX SELECT to empty for unlimited entries and to 1 for a maximum of one entry):
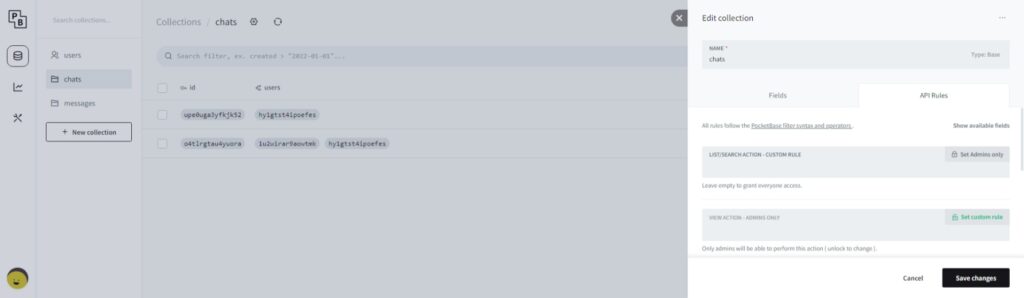
Next, we have to create API Rules. For that, you have to click on “API Rules” in the New collection screen, or you click on the settings icon of the existing collection. For simplification, we will set all rules to allow everyone to see everything (for your own applications, you should set them as needed). Click on the green “Set custom rule” button on every rule. In this example, I already changed the first rule:
Do this for all tables. So after you are done, you can request data from every table inside the app!
Now I suggest you create some mock data, for example, two users, one chat, and some messages inside your pocketbase instance, so we can immediately work with some mock data in the UI building process.
Extend svelte application with routing
To extend the current application with routing, we will use the package svelte-spa-router. As a little disclaimer: I will not show the code for the different screens and components in this guide. I will only show the code necessary to retrieve the data and realtime data from pocketbase and other logic-related snippets. Check the GitHub repository here to get all the code from the application. If you have any questions, feel free to ask me via chat, ask in the comments, or email me at mail@programonaut.com.
If this guide is helpful to you and you like what I do, please support me with a coffee!
The steps to set up routing are:
npm i svelte-spa-router- Add the possible routes inside
App.svelte:
<script lang="ts">
  import Router, { push } from "svelte-spa-router";
  import LoginScreen from "./LoginScreen.svelte";
  import UserScreen from "./UserScreen.svelte";
  import ChatOverviewScreen from "./ChatOverviewScreen.svelte";
  import ChatScreen from "./ChatScreen.svelte";

  const routes = {
    "/": LoginScreen,
    "/user": UserScreen,
    "/chats": ChatOverviewScreen,
    "/chats/:id": ChatScreen
  };
</script>

<Router {routes} />- Now add the navigation in needed places (after login, after logout, etc.). To open a different route, you can call
push('#/route'). For example, you can add this inside theLoginScreen.sveltefile after successfully logging in by pushing the route ‘user’.
Generate types for the pocketbase tables
For a better developer experience, we generate types for the different Pocketbase tables. This step is helpful when using Typescript, but it is optional. Run this command:
npx pocketbase-typegen --db <path/to>/pb_data/data.db --out src/types/pocketbase-types.tsCreate chats in pocketbase and show them in realtime
To show the chats, we first need to create a new screen called ChatOverviewScreen.svelte. Inside the screen, we will have an array of chats, and we will use that array to show chat components on the screen. In addition to the chats, we will also create an option to create a new chat by entering the email address of the user we want to connect with.
To fill the array with chats, we will request an initial version of all chats and create a subscription that subscribes to all changes inside the chats table. When it detects a change in the table, we will update the array of chats.
We will create a function to request the chats of the user. For that, we need to query the chats table and expand it with the user data. Using the pocketbase SDK, this will look like this:
function getChatWithUsers() {
    try {
        return pocketbase.collection('chats').getFullList<ChatsResponse>(200 ,{
            sort: 'created',
            expand: 'users',
            filter: `users ~ '${$currentUser.id}'`,
        });
    }
    catch (e) {

        // a function we created in the previous post
        errorMessage(e);
        return [];
    }
}
We will call this function after the page is mounted and inside pocketbase subscription:
onMount(async () => {
    allChats = await getChatWithUsers();

    pocketbase.collection('chats').subscribe('*', async (e) => {
        allChats = await getChatWithUsers();
    });
})
Finally, to prevent memory leaks, we should unsubscribe from the channel when the component is destroyed:
onDestroy(() => {
    pocketbase.collection('chats').unsubscribe('*');
})
The process for the realtime messages will be similar. But before we look into that, let’s add a function to create a new chat. For that, we will first check if the other user exists, then create a new chat with the current user id and the id of the other user:
async function createChatWithUser() {
    try {
        const otherUser = await pocketbase.collection('users').getFirstListItem<UsersResponse>(`email = '${newUserEmail}'`);

        await pocketbase.collection('chats').create({
            users: [$currentUser.id, otherUser.id]
        });
    }
    catch (e) {
        errorMessage(e);
    }
}
Create messages in pocketbase and show them in realtime
As already mentioned, we will follow a similar process to the chats to create messages with realtime updates. For the whole screen, we will create two functions, the first one to check all messages in a given chat and then a function to create a new message in this chat. We will call the get all messages function to initialize the page and whenever the messages table changes.
So let’s first create the message retrieval function:
function getAllMessages() {
  try {
    return pocketbase.collection("messages").getFullList<MessagesResponse>(200, {
      sort: "created",
      filter: `chat_id = '${chatId}'`,
    });
  }
  catch (e) {
      errorMessage(e);
      return [];
  }
}
We then call this function and subscribe to realtime changes on the supabase table messages after the component finished mounting:
onMount(async () => {
    allMessages = await getAllMessages();

  pocketbase.collection("messages").subscribe("*", async (e) => {
    allMessages = await getAllMessages();
  });
});
And to prevent memory leaks, we will unsubscribe the changes when the component is destroyed:
onDestroy(() => {
  pocketbase.collection("messages").unsubscribe("*");
});
Now the second function is used to create a new message and uses the author_id of the currently authenticated user and the chat_id of the current chat:
async function sendMessage() {
  try {
    await pocketbase.collection("messages").create({
      chat_id: chatId,
      author_id: $currentUser.id,
      content: newMessage,
    });
  } catch (e) {
    errorMessage(e);
  }
}
The messages are an array, and we display them in svelte based on that array. Check out the GitHub Repository here to see how I did that in svelte.
Conclusion
In this blog post, we learned how to create a realtime chat application using Pocketbase and Svelte. We started by creating the Pocketbase tables necessary for our chat functionality, including chats and messages. Then we set up API Rules to ensure that the users can access the data. We then extended the Svelte application from the previous post with routing and created screens to display the chats and the messages of a chat. Next, we implemented realtime functionality using Pocketbase, allowing us to display new chats and messages as they were added to the database.
If you enjoyed this post and want to stay up-to-date on the latest updates and new blog posts, consider subscribing to my monthly newsletter.
[convertkit form=2303042]
Discussion (0)
Related Posts