Print in console JavaScript: Level up your logs to be more helpful
Do you want to learn how to print meaningful log messages in the JavaScript console? Then you are in the right place because we will first look at logging basic messages to the console, how it works and how it can help you with programming. After that, we will learn how to ease the process of writing log messages and how to format messages to be more helpful inside the browser.
Print your first message to the console
Printing your first message to the console is one of the first things you do in nearly every programming language as a “hello world”. So let us do that for the sake of completeness as well. To print something to the console in JavaScript, you have to use the console.log method (later, we will learn more methods). So let us create the hello world:
console.log("hello world");Nice. The first task is done!
Now, where can we use this hello world? The answer is everywhere in the frontend and the backend. The frontend console is accessible in your browser by opening the DevTools (F12) and navigating to the console tab.

The backend console is accessible through the terminal you use to execute the script. An example for the backend is NodeJs. You can use it to create servers, APIs, and more.
In the following sections, we will execute all functions inside the browser console, but as already discussed before, it will work the same in the backend.
When to print a message in the console
Now that we discussed how to print in the javascript console and what possible environments we can use, we will look at why and when you should create log messages. Most of the time, log messages are not important for the end-user. Instead, they are here to help developers find problems or track certain points in their code.
If this guide is helpful to you and you like what I do, please support me with a coffee!
So let’s first look at the use cases for developers and, in the end, also give one example where the end-user might encounter log messages.
One popular use case is using log messages during the development process of an application. In the beginning, not everything is already visible within the UI, but you already want to check if the outcome is correct.
For example, you are creating a rock, paper, scissors game, and you currently have the buttons to select your choice and the automated choice of the ai. After each round, you would have to create HTML elements and style them to display the winner. But with log messages, you can write that to the console and check if your current logic is correct.
console.log("You are the winner!");But there are also use cases where log messages are needed in the final product. I know I said we would have a look on the frontend, but I think also seeing other perspectives is important! So besides the frontend, sometimes JavaScript is used to create interactive scripts. Inside these scripts, the log messages guide the user through a process.
For example, you created a script to ease the process of installing one of your tools. This would start with a log message like “Welcome to the installer!” and then print stuff in the console where the user has to input data or choose an option like: “Input the installation path here:”.
Ease the process of writing log messages
In the last section, we learned how to write stuff in the console and when or why we should do it. On the other hand, we will look at some methods to ease writing your messages and adding the stuff that is valuable for you.
We will continue with the rock paper scissors example, and now we want to print what the player has chosen. For this, we can use the basic concatenation of strings using the + operator like this:
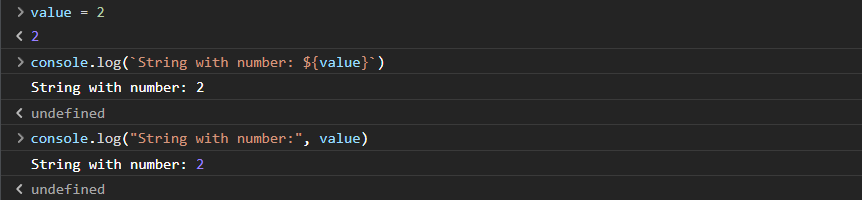
console.log("Player chose: " + playerSelection);In addition to the basic concatenating of strings with the + operator, there exist to called template strings. They make it way easier to create a nice string, including variables. You can create them by creating a string like this: `string` and inputting the variables inside of the string like this: ${variable}. So for our example, this looks like this:
console.log(`Player chose: ${playerSelection}`);I like creating strings like this because you can see the result better. But to be fair, it’s a preference because the result between template string and using + is the same.
First as and information: You can input as many values into the console.log function as you want. The inputs will be automatically concatenated with a space in between them. So, the function call would look like this:
console.log("Player chose:", playerSelection);As a bonus, doing it like this will keep the data type of the input variables visible. For example, you can see this in the following picture:
But you can also use the inputs differently. First, you can give it a format string and then the variables to substitute the values. A format string looks like this: “Player chose: %s”. %s tells the console.log that the first variable after the string will be a string and should be included in this position. For our example, the log message looks like this:
console.log("Player chose: %s", playerSelection);Other possible format specifiers are:
%s → Formats the value as a string
%i or %d → Formats the value as an integer
%f → Formats the value as a floating point value
%o → Formats the value as an expandable DOM element. As seen in the Elements panel
%O → Formats the value as an expandable JavaScript object
%c → Applies CSS style rules to the output string as specified by the second parameter
You have four different methods to print a log message in the console. You can choose the one you prefer because they all enable you to deliver valuable information.
Format you message before you print it to the console
In this sections, we will look at using colors, other formatting options, and other methods to log to the console.
Formatting basics (only frontend)
Changing the style and formatting of a console.log message is possible through the %c format specifier. You can apply any CSS style to the message and make it unique. To learn more about CSS, check my introduction post here.
For example, we could first change the color of our whole message to red:
console.log("%cPlayer chose: %s", "color: red;",playerSelection);This results in the following output:

Now let us apply a second style to the string. Let’s make the playerSelection white and bold:
console.log("%cPlayer chose: %c%s", "color: red;", "color: white; font-weight: bold" ,playerSelection);This results in this output:

With that, we learned how to create helpful log messages by using colors. You can use this to better find problems in your code or highlight important actions in your code!
Different methods used to print in the console
Now let us look at some more methods we can use to print to the javascript console and what they do (color changes only happen in the browser console):
console.info
The console.info() method outputs an informational message to the console. Inside of the web console, it is marked as informative. In the backend, on the other hand, it is just an alias for console.log.
You can call the method exactly as console.log!
console.error
The console.error() method outputs an error message to the console. In the web console, it is marked as an error. In the backend, it prints to the standard error output: stderr.
You can call the method exactly as console.log!
console.table
With the table, we can visualize data in multiple dimensions. For example, it is super useful to display an array with the index and value like this:
console.table(["val1","val2","val3"]);Resulting in this:

Besides arrays, you can also visualize other collections like objects.
One cool example that I want to show here is that you can display a tic tac toe field inside of your console with ease. That can be useful when coding a tic tac toe game from stretch:
console.table([["X","X","O"],["X","O"," "],[" "," "," "]]);Resulting in this output:

console.group
This is more useful for the web console but is still available for the backend. This method group consists of:
- console.group(”label”) / console.groupCollapsed(”label”): start group (open/collapsed)
- console.groupEnd(): end the group
It is used to group multiple log messages. Using it inside a script like this:
console.group("group 1");
console.log("hello");
console.log("world");
console.groupEnd();
console.log("not in the group");
results in this output:

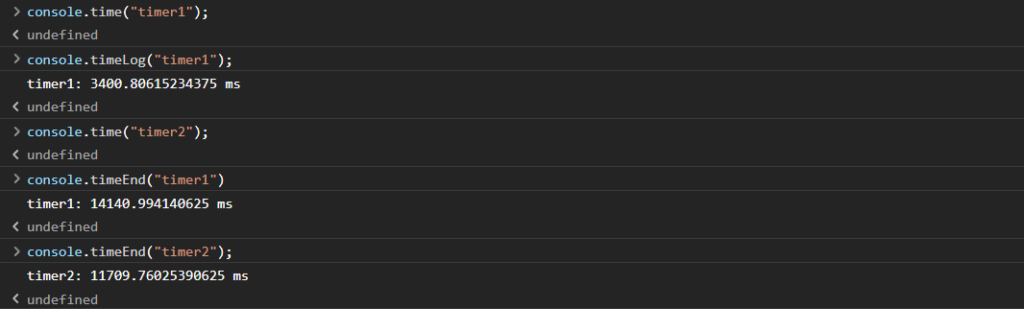
console.time
When you need to stop the time for some reason, you can do this by using the console.time method bundle, consisting of:
- console.time(”label”): to start a timer
- console.timeLog(”label”): to print the current time in timer
- console.timeEnd(”label”): to end a timer
And you can use it like this:
console.clear
And lastly, after you have printed so many messages in the console, you can remove all of them by calling console.clear().
Conclusion
In this post, we learned how to print messages in the javascript console, why you would do it, how to ease the process and what other methods exist besides the basic console.log. My highlight is the console.table method, what is yours?
I hope this post taught you something new, and you can now create helpful log messages!
In case you are interested in more software- and web-development related topics, consider subscribing to my newsletter! You will also get a free ebook about HTML, CSS, and Javascript!
[convertkit form=2634876]
Discussion (0)
Related Posts