How To Host A Mail Server With Docker For Free (Step-by-Step)
Are you looking for an easy and cost-effective way to host a mail server? With Docker, you can now host a mail server for free in a few simple steps. In this guide, we will cover what a mail server is, what you need one for, and how you can use Docker to host your own mail server. We will also discuss testing the server with Pocketbase. So if you want to know how to host a mail server with Docker for free, keep reading!
- What is a mail server, and what do I need it for?
- How to host a mail server using docker
- Testing the mail server with Pocketbase
- Conclusion
What is a mail server, and what do I need it for?
A mail server is responsible for sending, receiving, and storing email messages. It is a critical component of any online communication system, allowing users to communicate and stay in touch with each other. Having a mail server allows you to send and receive emails, as well as store messages for future reference.
It can be used for different applications, like Pocketbase. Here, you can send emails to your users, for example, when they need to verify their accounts.
How to host a mail server using docker?
In this section, we will learn how to host a mail server with docker step-by-step. My suggestion is to run this on your own Linux server, so the mail server is online 24/7. In the following section, I will symbolize values you have to enter like this: <domain>. In this case, you would need to enter your domain or subdomain, for example, programonaut.com
Requirements:
- Domain: You can use a domain from Namecheap or another domain provider.
- Linux Server with Docker installed: You can find a good VPS on Namecheap, for example, the Pulsar tier.
(Affiliate Links)
Steps:
If this guide is helpful to you and you like what I do, please support me with a coffee!
- Configure domain records (at the domain registrar): Hostname Record Value mail.
| Hostname | Record | Value |
|---|---|---|
| mail.<domain> | A | <ip-of-server> |
| mail.<domain> | MX | <prio> mail.<domain> |
- Create a directory on your server called
mailserver. - Create a file
mailserver/mailserver.envwith the following content (you can find the default file here):
DMS_DEBUG=0
LOG_LEVEL=info
ONE_DIR=1
ENABLE_UPDATE_CHECK=1
UPDATE_CHECK_INTERVAL=1d
PERMIT_DOCKER=none
ENABLE_SRS=0
ENABLE_OPENDKIM=1
ENABLE_OPENDMARC=1
ENABLE_CLAMAV=0
ENABLE_RSPAMD=0
ENABLE_AMAVIS=1
AMAVIS_LOGLEVEL=0
ENABLE_DNSBL=0
ENABLE_FAIL2BAN=0
FAIL2BAN_BLOCKTYPE=drop
POSTSCREEN_ACTION=enforce
SSL_TYPE=letsencrypt
ENABLE_QUOTAS=1
LOGROTATE_INTERVAL=weekly
POSTFIX_INET_PROTOCOLS=all
DOVECOT_INET_PROTOCOLS=all
ENABLE_SPAMASSASSIN=0
SPAMASSASSIN_SPAM_TO_INBOX=1
ENABLE_SPAMASSASSIN_KAM=0
MOVE_SPAM_TO_JUNK=1
SA_TAG=2.0
SA_TAG2=6.31
SA_KILL=10.0
SA_SPAM_SUBJECT=***SPAM*****
ENABLE_FETCHMAIL=0
FETCHMAIL_POLL=300
DOVECOT_MAILBOX_FORMAT=maildir
ENABLE_POSTGREY=0
POSTGREY_DELAY=300
POSTGREY_MAX_AGE=35
POSTGREY_TEXT="Delayed by Postgrey"
POSTGREY_AUTO_WHITELIST_CLIENTS=5
ENABLE_SASLAUTHD=0
SRS_SENDER_CLASSES=envelope_sender
RELAY_PORT=25
RELAY_PASSWORD=
- Create
mailserver/docker-compose.ymland add the following content:
services:
  mailserver:
    image: docker.io/mailserver/docker-mailserver:latest
    container_name: mailserver
    hostname: mail
    domainname: <domain>
    env_file: mailserver.env
    ports:
      - "25:25"    # SMTP  (explicit TLS => STARTTLS)
      - "143:143"  # IMAP4 (explicit TLS => STARTTLS)
      - "465:465"  # ESMTP (implicit TLS)
      - "587:587"  # ESMTP (explicit TLS => STARTTLS)
      - "993:993"  # IMAP4 (implicit TLS)
    volumes:
      - ./data/dms/mail-data/:/var/mail/
      - ./data/dms/mail-state/:/var/mail-state/
      - ./data/dms/mail-logs/:/var/log/mail/
      - ./data/dms/config/:/tmp/docker-mailserver/
      - ./data/letsencrypt:/etc/letsencrypt
      - /etc/localtime:/etc/localtime:ro
    restart: always
    stop_grace_period: 1m
    cap_add:
      - NET_ADMIN
    healthcheck:
      test: "ss --listening --tcp | grep -P 'LISTEN.+:smtp' || exit 1"
      timeout: 3s
      retries: 0

	certbot:
    image: certbot/certbot
    container_name: certbot
    ports:
      - "80:80"
    volumes:
      - ./data/letsencrypt:/etc/letsencrypt
      - ./data/certbot/logs:/var/log/letsencrypt/
    command: certonly --standalone --force-renewal --email <mail> -d mail.<domain> --agree-tos
- Run
docker compose up -dto initialize the mailserver and retrieve an SSL certificate. (To renew the certificate, you have to rundocker compose up -d cerbot, you can automate that by running cron once a month.) - Add a mail user:
docker exec -ti mailserver setup email add <user@domain> - Add DKIM:
docker exec -ti mailserver setup config dkim - Copy the content of the file
docker-data/dms/config/opendkim/keys/example.com/mail.txtand add it to your DNS as a TXT record.
| Hostname | Record | Value | Notes |
|---|---|---|---|
| mail.<domain> | TXT | “v=DKIM1; h=sha256; k=rsa; p=ABC…” | p might be in separate strings and has to be concatenated into one. |
- Steps 5-7 have to be repeated for new users.
With that, you hosted your very own mailserver using Docker. I hope this guide was helpful, and if there is any question, feel free to ask in the chat or join my Discord community and ask me or the other members.
Testing the mail server with Pocketbase
Now we will use the mailserver we just created to configure Pocketbase to use it. To learn more about what pocketbase is, check this post here. If you want to try to send a mail, follow these steps:
- Download the newest Pocketbase version here and unzip it.
- Run the executable using:
./pocketbase serve - Open the Pocketchat Admin UI and go to “Settings” > “Mail Settings”
- Enter the data as follows and then send a test mail:

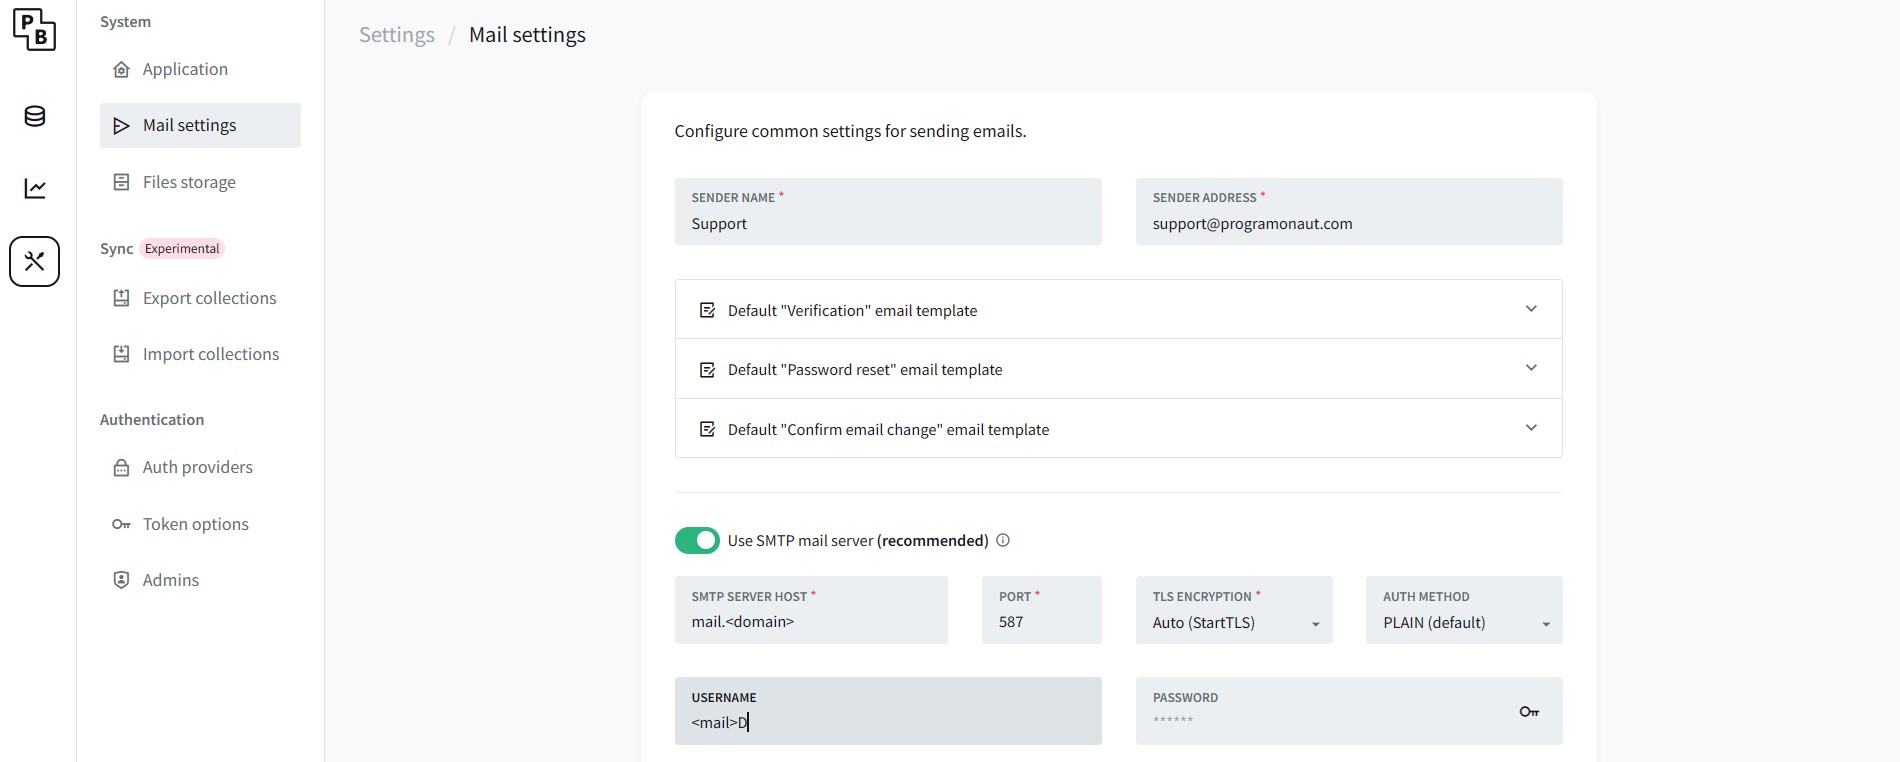
Now you can check your inbox and hopefully see an incoming email!
Conclusion
Now you know how to host a mail server with Docker for free and have tested it with Pocketbase. In this guide, we have covered what a mail server is, what you need one for, and how you can use Docker to host your own mail server. We also discussed testing the server with Pocketbase.
By following the steps outlined in this guide, you should now be able to host your own mail server with Docker for free. If you have any questions or need help, you can join the Discord community.
Don’t forget to subscribe to my monthly newsletter to stay up-to-date on all my blog posts and updates. Sign up now and never miss a post!
[convertkit form=2303042]
Discussion (5)
Related Posts