Validate Form with JavaScript: An easy and comprehensive Guide
Do you want to learn how to validate your input form with javascript? Then you are in the right spot because, in this post, we will learn how validation works, if you need javascript or if the built-in HTML tools are enough.
During my research, I was surprised by how much is possible only with HTML, so be sure to read the validation part carefully!
Let’s get started with the post. First, we will create a form, and then we will add different types of validation on top of it:
Create a Form with HTML
The first step before validating the user input in our form is to create one! For this, we will make the following form with HTML and CSS:
First of all, we create the form itself using the form element. This element is used as a container for all the different input fields you can create for the user input:
<form name="custom-form">
<!-- here we will place the user inputs -->
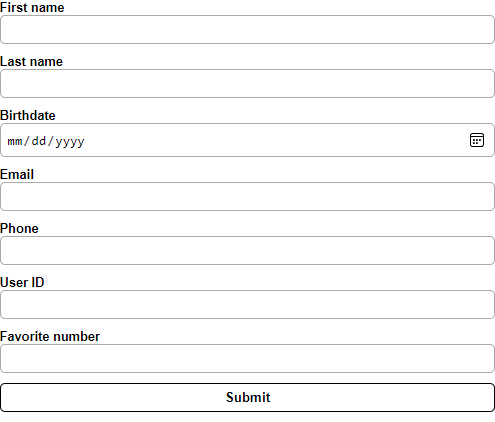
</form>When we look at the image of the final form, we can see the following input fields that we have to create:
- first name (text)
- last name (text)
- birthdate over 18 (date)
- email (email)
- phone number (tel)
- user id with a pattern (text)
- favorite number between 1-100 (number)
We can now add them to our form by first defining a label (optional, used as the input description) and then the input field itself:
If this guide is helpful to you and you like what I do, please support me with a coffee!
<form name="custom-form">
	<label for="first-name">First name</label>
	<input id="first-name" name="first-name">
	<label for="last-name">Last name</label>
	<input id="last-name" name="last-name">
	<label for="birthdate">Birthdate</label>
	<input id="birthdate" name="birthdate">
	<label for="email">Email</label>
	<input id="email" name="email">
	<label for="phone">Phone</label>
	<input id="phone" name="phone">
	<label for="uid">User ID</label>
	<input id="uid" name="uid">
	<label for="favorite-number">Favorite number</label>
	<input id="favorite-number" name="favorite-number">
</form>
This results in the following form:

At the moment, the user does not have to input any data. Because of that, we can set certain parts of our form to be required. If we add the required attribute to an input field, we cannot submit the form without filling in the defined field. You can add the required attribute like this (in our case, I will not add it because it eases the process of testing):
<input id="favorite-number" name="favorite-number" required>But how do we submit the form? For this, we are only missing one crucial thing. We have to add the ability to submit the form. To do it, we have to append a submit input field to the form like this:
<form name="custom-form">
	<!-- ... -->
	<input type="submit" value="Submit">
</form>
To better understand what the submit method is used for, check here. Because in this post, we only want to create the form and validate the inputs rather than using submitted data!
Lastly, we also want to change the visuals of the form. To do this, we have to add the following CSS:
form {
    display: flex;
    flex-direction: column;

    font-family: sans-serif;
    margin: auto;
    width: 30%;
}

label {
    font-size: 0.8em;
    font-weight: bold;
}

input {
    border: 1px solid darkgray;
    border-radius: 5px;

    padding: 6px;
    margin-bottom: 10px;
}

input[type="submit"] {
    background-color: transparent;
    border: 1px solid black;
    font-weight: bold;
}

input[type="submit"]:hover {
    background-color: black;
    color: white;
}
That results in the expected form! In case you do not know how CSS works or how you import it into HTML, check my post on the CSS basics here.
Validate Form Inputs
Now that we have created the form, we want to validate the form inputs. That means we want to check that the input has the expected format (e.g., email needs an @ symbol). First, we will look at how we can use the built-in form validation provided by HTML, and then we will look at how to do more complex stuff with JavaScript!
Validate Form Inputs with HTML
The most secure and recommended way is to use the provided type attribute that you can use with every input field. In the list above, we wrote down the different types our input fields need. So let us use this knowledge to add all types to the form with the following format:
<input type="number" id="favorite-number" name="favorite-number" required>Now that we know the syntax, let us extend it to all input fields:
<form name="custom-form">
	<label for="first-name">First name</label>
	<input type="text" id="first-name" name="first-name">
	<label for="last-name">Last name</label>
	<input type="text" id="last-name" name="last-name">
	<label for="birthdate">Birthdate</label>
	<input type="date" id="birthdate" name="birthdate">
	<label for="email">Email</label>
	<input type="email" id="email" name="email">
	<label for="phone">Phone</label>
	<input type="tel" id="phone" name="phone">
	<label for="uid">User ID</label>
	<input type="text" id="uid" name="uid">
	<label for="favorite-number">Favorite number</label>
	<input type="number" id="favorite-number" name="favorite-number">
</form>
(For a list of all possible input types, check here)
The good thing about the input types is that we can already sort out a lot of wrong inputs the user can make. For example, the user can not input a string into our favorite number input field. It does that by restricting the possible inputs, one really good example is the date type because it also visually changes the input field:

It also completely solves some of our problems. One example is that we do not have to create our own validation for the email field because the type property took care of this for us!
Validate Custom Inputs with HTML
Additionally, we can use one really powerful attribute to solve most of our problems for custom input! The pattern attribute. We can use it, for example, for the phone number or the user ID.
The following code will show you how to define a suitable pattern for our custom inputs:
<!-- Wanted format: 123-456-7890 -->
<input type="tel" id="phone" name="phone" pattern="[0-9]{3}-[0-9]{3}-[0-9]{4}">

<!-- Wanted format: x123-456! -->
<input type="text" id="uid" name="uid" pattern="x[0-9]{3}-[0-9]{3}!">
The pattern attribute uses a regex. Regex is a powerful pattern matching, and you can read more about it here.
Validate Form Inputs with JavaScript
You only need to validate form inputs with JavaScript in more complex situations. In our example, these are the birthdate over 18 and the favorite number between 1 and 100.
So let’s start with the basics to validate a form with JavaScript. The first step is to add an onsubmit event to the form element. In this event, we will call a JavaScript function that handles the validation of our form. You can add it like this:
<form name="custom-form" onsubmit="return validateForm()">To make the function callable, we first have to create it. In case you don’t know how to include JavaScript into HTML, check this post here. So let’s create the function and add some comments and sub-functions (we comment them out, so the function already works) for the different steps we need to do:
function validateForm() {
	let valid = true;
	// check birthdate
	//valid = validateBirthdate();
	// check favorite number
	//valid = valid ? validateFavoriteNumber() : false;
	return valid
}
We have created a variable valid that keeps track of any invalid input. In case one of the inputs is not valid, we will return the value false from the function and thus interrupt the submission. In case valid is true, the submission will go through. (This is not the optimal way to do it, it is just supposed to visualize the different steps you have to take.)
Validate age with JavaScript
Now, let’s start with the first validation, the birthdate. Therefore we uncomment line 3 of the validateForm() function. Additionally we will create the validateBirthdate() function:
function validateBirthdate() {
	// get current date

	// get input date

	// return if age is over 18

}
Okay, now we know the different steps we need to take. Let’s first get the current date:
//Sat Dec 11 2021 13:33:17 GMT+0100 (Central European Standard Time)
let currentDate = new Date();
then the date from the input field (for this, we have to use DOM selectors, in case you do not know them to check this post here):
let input = document.getElementById("birthdate").value;
let birthdate = new Date(input);
And lastly, we have to subtract them and check if the age is greater than 18:
let diff = new Date(currentDate - birthdate)
let age = Math.abs(diff.getUTCFullYear() - 1970);

return age >= 18;
Finally, let’s bring it all together:
function validateBirthdate() {
	// get current date
	let currentDate = new Date();
	// get input date
	let input = document.getElementById("birthdate").value;
	let birthdate = new Date(input);
	// return if age is over 18
	let diff = new Date(currentDate - birthdate)
	let age = Math.abs(diff.getUTCFullYear() - 1970);

	return age >= 18;
}
and try it out (left under 18, right over 18):
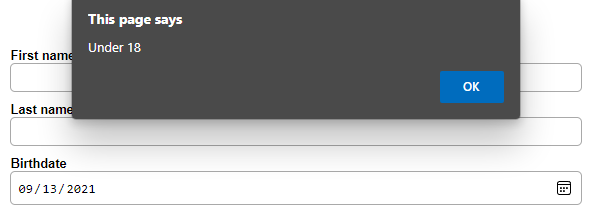
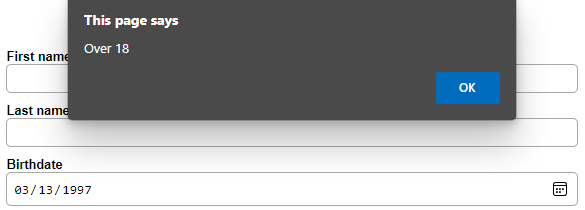
To get the alert, we can add the following line inside of the validate form function:
alert(valid ? "Over 18" : "Under 18");Validate a number range with JavaScript
Lastly, the validation that our favorite number is between 1 and 100. For that, we will uncomment line 5 in our validate Form script and create the validateFavoriteNumber() function like this:
function validateFavoriteNumber() {
	// get input number

	// return if number between 1 and 100

}
After writing down the steps, we know the process we have to follow to validate the input. For that, let’s first get the user input:
let input = document.getElementById("favorite-number").value;check if it is between 1 and 100 and return that:
// 1 and 100 are included
return input >= 1 && input <= 100;
Finally, bring it all together:
function validateFavoriteNumber() {
	// get input number
	let input = document.getElementById("favorite-number").value;
	// return if number between 1 and 100
	return input >= 1 && input <= 100;
}
and try it out (left out of range, right in range):
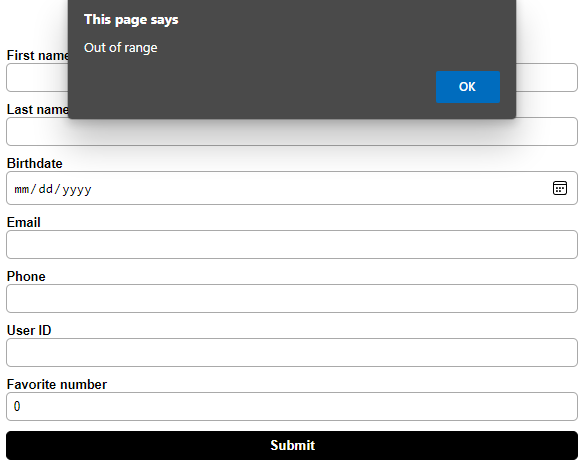
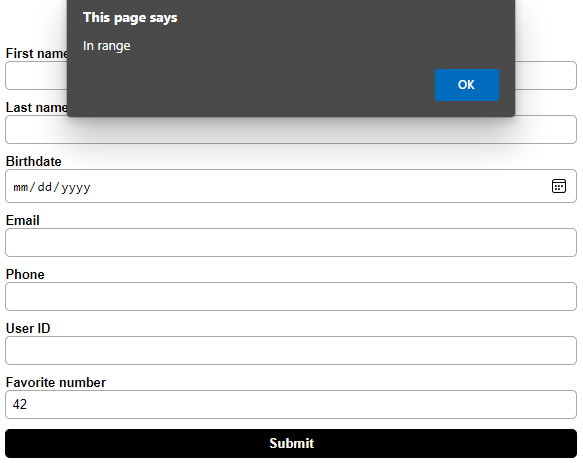
To get the alert, we can add the following line inside of the validate form function:
alert(valid ? "In range" : "Out of range");Conclusion
In this post, we created a form and later added different kinds of validation. It is surprising how much stuff you can already achieve with the basic HTML validation, especially with the pattern attribute!
Here is a short list of things we can validate with HTML:
- That it is the number type
- That it follows a certain pattern (with the pattern attribute)
- That it is an email
- That it is a date
- etc.
To summarize the JavaScript validation is only needed in some special cases, like age validation or checking that a number is in a certain range.
I hope this post was helpful for you and offered some new insights. You can find the custom form and the written code on my GitHub here. In case there are some open questions, feel free to ask, and I will try to help you!
If you are interested in more software- and web-development related stuff, subscribe to my newsletter and retrieve a free e-book on top!
[convertkit form=2634876]
Discussion (0)
Related Posts