How To Automate SSL With Docker And NGINX
Do you want to learn how to automate the NGINX and SSL setup for new docker containers you create? In this post, we will learn how to completely automate this process for every web application you wish by using two simple to setup containers!
Therefore we will go in-depth in the following sections:
Overview
In one of my earlier guides, I explained why and how to set up SSL with docker and NGINX manually. In case you are interested, you can find the guide here.
Before starting to look at the setup, let’s first talk about the different technologies that we are using and what we are using them for:
- Lets Encrypt: Get free and automated SSL certificates for your applications
- NGINX: Reverse proxy to secure your web applications
- Docker: Host your applications and make them public to the web behind NGINX
The basic process of getting your web application to the web with these technologies is that you first need to configure your application inside of NGINX with an URL or path where it should be available. Then your application and request a let’s encrypt certificate manually or through something like certbot.
I will show you how we can automate this process, which means that first, an NGINX config is generated, and then a certificate is requested.
To automate the process, two containers are needed. First, nginx-proxy that takes care of the automated configuration, and then the letsencrypt-nginx-proxy-companion that automatically requests the SSL certificate when the web app container is built.
If this guide is helpful to you and you like what I do, please support me with a coffee!
Automate the NGINX setup
So now that we learned how it should work theoretically let’s setup everything up. First, we will automate the NGINX configuration for new docker containers. Therefore inside a docker-compose.yml file, we add the following configuration for the nginx-proxy container (you can build it by using docker-compose up -d or docker compose up -d in the directory of the file):
nginx:
    container_name: nginx
    image: nginxproxy/nginx-proxy
    restart: unless-stopped
    ports:
        - 80:80
        - 443:443
    volumes:
        - /var/run/docker.sock:/tmp/docker.sock:ro
        - /var/docker/nginx/html:/usr/share/nginx/html
        - /var/docker/nginx/certs:/etc/nginx/certs
        - /var/docker/nginx/vhost:/etc/nginx/vhost.d
    logging:
        options:
            max-size: "10m"
            max-file: "3"
Now let’s have a look at what each of these properties does for our NGINX container:
- container_name: Sets the container name for easier access to nginx.
- image: The needed image.
- restart: If the container stops because of an error or something, it will try to restart automatically.
- port: NGINX must be available on ports 80 (HTTP) and 443 (HTTPS).
- volumes: The docker.sock volume is needed so that the container can automatically generate the config for new containers. The other volumes are directories holding configurations and similar things.
- logging: To not generate too big logs (in this case, only 3 files with a max of 10 MB)
That’s it. With this, we automated the process of generating a reverse proxy config for new docker containers. To try it out, you need to add the VIRTUAL_HOST environment variable to one of your containers, and you have to make a port available to access by the nginx-proxy container. This could look something like this:
example:
    container_name: example
    image: example/image
    expose:
        - "3000"
    environment:
        VIRTUAL_HOST: example.com
Now you need to build the container, and it should be available under http://example.com.
Automate the SSL setup
Next up, we automate the request of the SSL certificate for the new docker containers that are available through the NGINX config. Therefore we need to add the let’s encrypt companion to our docker-compose.yml file:
letsencrypt-companion:
    container_name: letsencrypt-companion
    image: jrcs/letsencrypt-nginx-proxy-companion
    restart: unless-stopped
    volumes_from:
        - nginx
    volumes:
        - /var/run/docker.sock:/var/run/docker.sock
        - /var/docker/nginx/acme:/etc/acme.sh
    environment:
        DEFAULT_EMAIL: test@mail.com
Now let’s have a look at what the different properties mean:
- container_name: Sets the container name for easier access to letsencrypt-companion.
- image: The needed image.
- restart: If the container stops because of an error or something, it will try to restart automatically.
- volumes_from: Get access to the volumes created by the nginx container (especially the cert directory).
- volumes: The docker.sock volume is needed so that the container can automatically generate the config for new containers. The acme directory contains files regarding the certificate request.
- environment: The default email used for the certificate request.
With that, we also automated the SSL request. To get it to work for other containers, we need to add the LETSENCRYPT_HOST environment variable:
example:
    container_name: example
    image: example/image
    expose:
        - "3000"
    environment:
        VIRTUAL_HOST: example.com
        LETSENCRYPT_HOST: example.com
After building the container with docker-compose up -d or docker compose up -d the automated process is started. As a result, you can access the app under https://example.com with a valid SSL certificate.
Example
So lastly, for ease of use, let’s create one example with a little hello world express app to show you how you would set it up with your web application. For this example, I will use the express-hello-world image because it is just for visualization purposes.
The goal is to bring this hello world app to the web by running the two containers set up before. Therefore we need to set both the VIRTUAL_HOST and LETSENCRYPT_HOST environment variables for the hello world container. The final docker-compose.yml file looks like this:
services:
    nginx:
        container_name: nginx
        image: nginxproxy/nginx-proxy
        restart: unless-stopped
        ports:
            - 80:80
            - 443:443
        volumes:
            - /var/run/docker.sock:/tmp/docker.sock:ro
            - /var/docker/nginx/html:/usr/share/nginx/html
            - /var/docker/nginx/certs:/etc/nginx/certs
            - /var/docker/nginx/vhost:/etc/nginx/vhost.d
        logging:
            options:
                max-size: "10m"
                max-file: "3"

    letsencrypt-companion:
        container_name: letsencrypt-companion
        image: jrcs/letsencrypt-nginx-proxy-companion
        restart: unless-stopped
        volumes_from:
            - nginx
        volumes:
            - /var/run/docker.sock:/var/run/docker.sock
            - /var/docker/nginx/acme:/etc/acme.sh
        environment:
            DEFAULT_EMAIL: test@mail.com

    hello-world:
        container_name: hello-world
        image: kornkitti/express-hello-world
        expose:
            - "8080"
        environment:
            VIRTUAL_HOST: test.programonaut.com
            LETSENCRYPT_HOST: test.programonaut.com
When we then run docker-compose up -d or docker compose up -d the three containers are built, and after some time, the hello world is available under the set URL. For me, the final result looks like this:
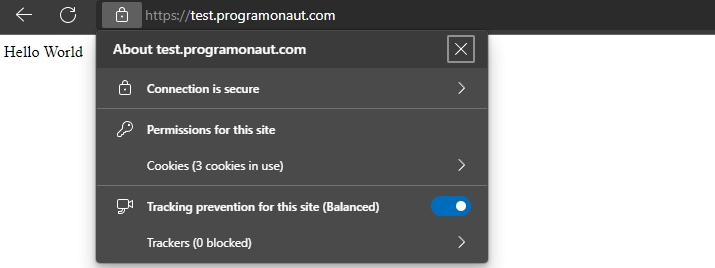
As you can see, the application is available and has a valid SSL certificate.
Conclusion
In this post, we learned how to automate SSL with docker and NGINX to save us a lot of time. Ultimately, we only need to set up two containers once, and they take all of the configuration work away from us. With this approach, you can bring your web apps online in minutes!
In case you have any questions, feel free to contact me at mail@programonaut.com, in the chatbox on the right, or through Twitter!
If you liked this guide, consider subscribing to my newsletter to get monthly updates on all my posts and receive a free docker compose cheat sheet!
[convertkit form=2649016]
Discussion (11)
Related Posts