How To Create A Simple CRUD Application using SvelteKit and Pocketbase
Do you want to learn how to create an application to Create, Read, Update and Delete (CRUD) entries using SvelteKit and Pocketbase? In this post, we will do exactly this based on the other things we already did in this course, so check the other posts if you haven’t!
This is the sixth part of my free Pocketbase course, check the introduction and a list of all posts here.
- Set up Skeleton modals and toasts
- Perform Create, Read, Update and Delete (CRUD) using SvelteKit and Pocketbase
- Update and create a modal
- The dashboard UI
- Conclusion
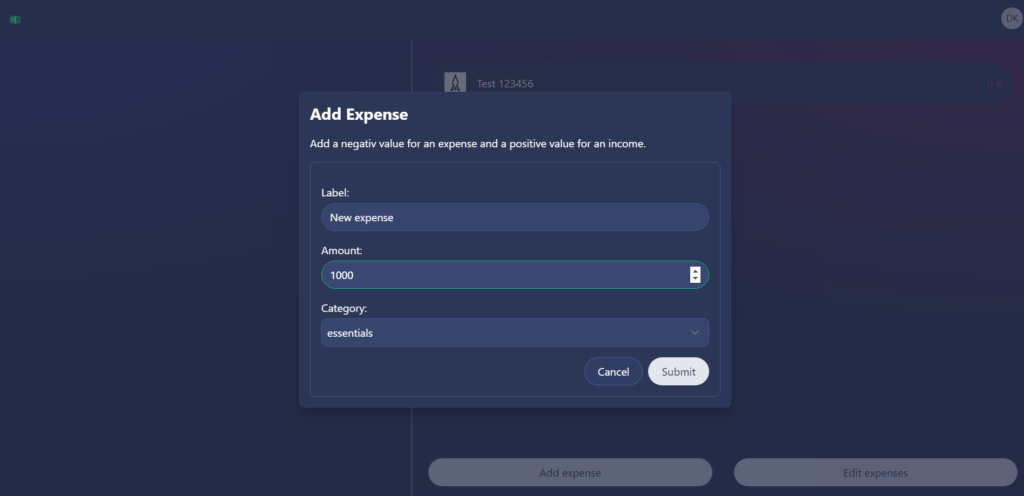
In this post, we will create the following dashboard in our existing application:
Set up Skeleton modals and toasts
As we will use modals and toasts for our UI, we will set them up using Skeleton UI. We will use modals to allow the users to add and update expenses and toasts to inform them if it worked or not. To get started, we will create a new file called src/lib/components/modals/modalRegistry.ts with an export called modalRegistry. The registry itself consists of a key and a reference to an actual modal component. In this case the AddExpenseModal which we will create later on. The correct modal can then be called by using the key inside the modal settings.
import type { ModalComponent } from "@skeletonlabs/skeleton";
import AddExpenseModal from "./AddExpenseModal.svelte";

export const modalRegistry: Record<string, ModalComponent> = {
    addExpenseModal: { ref: AddExpenseModal }
};
Next, we have to src/routes/+layout.svelte and import the registry, the modal and toast components and then initialize the stores. After that we add both the Toast component and the Modal component to the UI. Both of them are Singeltons and will be called from other components. The toast component will create toasts in the bottom right, and the Modal component will use the registry we created before.
<script lang="ts">
    import { modalRegistry } from '$lib/components/modals/modalRegistry';
    import '../app.postcss';

    // Floating UI for Popups
    import { computePosition, autoUpdate, flip, shift, offset, arrow } from '@floating-ui/dom';
    import { Modal, Toast, storePopup } from '@skeletonlabs/skeleton';
    import { initializeStores } from '@skeletonlabs/skeleton';

    storePopup.set({ computePosition, autoUpdate, flip, shift, offset, arrow });
    initializeStores();
</script>

<Toast position="br" zIndex="z-[999]" />
<Modal components={modalRegistry} zIndex="z-[888]"/>
<slot />
Perform Create, Read, Update and Delete (CRUD) using SvelteKit and Pocketbase
Next, we will add the right side of the dashboard. For this, we will modify the dashboard page.server.ts. Inside we will load all expenses of the current user and create form action to create, update and delete an expense.
First up, we will load the data inside of the load function. For this, we will first get all possible categories as we will need them in the create and update modal. And then, we will get all expenses with their respective category. We will then load the image of each category and return all of this to the user.
If this guide is helpful to you and you like what I do, please support me with a coffee!
export const load = (async ({ locals }) => {
    const categories = await locals.pb.collection('categories').getFullList<CategoriesResponse>();
    const expensesWithCategory = await locals.pb.collection('expenses').getFullList<ExpensesResponse<{category: CategoriesResponse}>>({expand: 'category'});

    const expensesWithCategoryAndImages = expensesWithCategory.map((expense) => {
        let icon = expense.expand?.category?.icon
        if (icon) {
            expense.expand!.category!.icon = locals.pb.files.getUrl(expense.expand?.category!, icon, {'thumb': '100x100'});
        }

        return expense;
    });

    return {expenses: expensesWithCategoryAndImages, categories};
}) satisfies PageServerLoad;
We will only get the expenses of the user without setting a filter or anything because we created the collection rules inside the pocketbase dashboard already. As a little reminder, if you haven’t yet, you should create some categories now, as we will not add the possibility of creating categories inside the application for now.
Next up are the actions. They behave similarly to the ones when we logged in. Meaning that we first check that the needed data is there, then we try to fulfill the action and then return a success or a failure if something didn’t work.
- To create, we need a data object containing a label, amount, category (id) and currency.
- To update something, we additionally need the item ID so that the correct item is updated.
- For the delete action, we only need the ID.
export const actions = {
    create: async ({ locals, request }) => {
        const data = await request.formData();
        data.append("currency", "€")

        const hasLabel = data.has('label');
        const hasAmount = data.has('amount');
        const hasCategory = data.has('category');
        if (!hasLabel || !hasAmount || !hasCategory) {
            return fail(400, {hasLabel, hasAmount, hasCategory})
        }

        try {
            await locals.pb.collection('expenses').create<ExpensesRecord>(data)
        } catch(e) {
            console.log(e);
            return fail(400, {unknown: true})
        }

        return { success: true, create: true }
    },
    update: async ({ locals, request }) => {
        const data = await request.formData();
        data.append("currency", "€")

        const hasId = data.has('id');
        const hasLabel = data.has('label');
        const hasAmount = data.has('amount');
        const hasCategory = data.has('category');
        if (!hasId || !hasLabel || !hasAmount || !hasCategory) {
            return fail(400, {hasId, hasLabel, hasAmount, hasCategory})
        }

        try {
            await locals.pb.collection('expenses').update<ExpensesRecord>(data.get('id')!.toString(), data)
        } catch(e) {
            console.log(e);
            return fail(400, {unknown: true})
        }

        return { success: true, update: true }
    },
    delete: async ({locals, request}) => {
        console.log("Delete");

        const data = await request.formData();

        const hasId = data.has('id');
        if (!hasId) {
            return fail(400, {hasId})
        }

        try {
            await locals.pb.collection('expenses').delete(data.get('id')!.toString())
        } catch(e) {
            console.log(e);
            return fail(400, {unknown: true})
        }

        return { success: true, update: true }
    }
}
Update and create a Modal
We will use one modal to both create and update an expense. The Modal will be created in its own component inside of src/lib/components/modals/modalRegistry/addExpenseModal.svelte. We will first import everything we need inside the component, then we create a reference to the parent object and the modal store.
Additionally, we get the categories and create a formData object from the store. The data consists of ID, user, label and amount. We will define the date later on using modal settings.
Besides this, we will also retrieve the toastStore and define a setting for a successful and failed toast.
<script lang="ts">
    import type { SvelteComponent } from 'svelte';
    import { getModalStore, getToastStore, type ToastSettings } from '@skeletonlabs/skeleton';
    import { enhance } from '$app/forms';

    export let parent: SvelteComponent;
    const modalStore = getModalStore();

    const categories = $modalStore[0].meta.categories ?? [];
    const formData = {
        id: $modalStore[0].meta.id ?? '',
        user: $modalStore[0].meta.user ?? '',
        label: $modalStore[0].meta.label ?? '',
        amount: $modalStore[0].meta.amount ?? 0,
    };

    const toastStore = getToastStore();
    const successToast = (create: unknown) => ({
        message: `The expense was ${create ? 'created' : 'updated'} successfully.`,
        background: 'variant-filled-success',
    } satisfies ToastSettings);
    const failureToast = {
        message: 'Something went wrong. Please try again.',
        background: 'variant-filled-error',
    }

</script>
Inside the UI, we will render the modal and, inside of it, the header and body of the settings object. Additionally we will create a form with the in the settings defined form action and the fields id (hidden and only for update), user (hidden), label, amount and category. The category is a select element based on the categories.
Finally, we have a footer to cancel the operation or create/update the expense. In the next step, we will create the settings to create the actual modals.
{#if $modalStore[0]}
    <div class="card p-4 w-modal shadow-xl space-y-4">
        <header class="text-2xl font-bold">{$modalStore[0].title ?? '(title missing)'}</header>
        <article>{$modalStore[0].body ?? '(body missing)'}</article>
        <form class="border border-surface-500 p-4 space-y-4 rounded-container-token" method="POST" action={$modalStore[0].meta.action} use:enhance={()=>{
            return async ({ result, update }) => {
                console.log(result);

                if (result.type === 'success') {
                    toastStore.trigger(successToast(result.data?.create));
                    modalStore.close();
                } else {
                    toastStore.trigger(failureToast);
                }
                update();
            }
        }}>
            {#if formData.id}
                <input type="hidden" name="id" value={formData.id} />
            {/if}
            <input type="hidden" name="user" value={formData.user} />
            <label class="label">
                <span>Label:</span>
                <input class="input" name="label" type="text" bind:value={formData.label} placeholder="Enter label..." required />
            </label>
            <label class="label">
                <span>Amount:</span>
                <input class="input" name="amount" type="number" bind:value={formData.amount} placeholder="Enter amount..." required />
            </label>
            <label class="label">
                <span>Category:</span>
                <select class="select" name="category">
                    {#if categories}
                    {#each categories as category}
                        <option value={category.id}>{category.name}</option>
                    {/each}
                    {/if}
                </select>
            </label>
            <footer class="modal-footer {parent.regionFooter}">
                <button class="btn {parent.buttonNeutral}" type="button" on:click={parent.onClose}>{parent.buttonTextCancel}</button>
                <button class="btn {parent.buttonPositive}" type="submit">Submit</button>
            </footer>
        </form>
    </div>
{/if}
The dashboard UI
Now that we have the server-side things to perform CRUD operations and the logic to use modals, we will create the right-hand side of our dashboard UI. It contains a list with all expenses and two buttons on the bottom to add a new expense or to edit an existing one.
To add and edit expenses, we will use a modal that displays a model if an action is performed successfully or failed.
To open the modal with the correct data, we will first get the page data and modal store. After that, we create the already mentioned modal settings for both update and create. The update settings are dynamic, as they need to retrieve the data of a specific expense.
Additionally, we will retrieve the toast store and create two notifications to show if a delete was successful or not. Lastly, we have a boolean called editExpenses to toggle the edit mode.
<script lang="ts">
    import { getModalStore, getToastStore, type ModalSettings, type ToastSettings } from '@skeletonlabs/skeleton';
    import type { PageData } from './$types';
    import { enhance } from '$app/forms';

    export let data: PageData;
    const modalStore = getModalStore();

    const categories = data.categories;

    const addExpenseModal: ModalSettings = {
        type: 'component',
        component: 'addExpenseModal',
        title: 'Add Expense',
        body: 'Add a negativ value for an expense and a positive value for an income.',
        meta: {
            user: data.user.id,
            action: '?/create',
            categories,
        }
    };

    const updateExpenseModal = (id: string, label: string, amount: number) => ({
        type: 'component',
        component: 'addExpenseModal',
        title: 'Update Expense',
        body: 'Add a negativ value for an expense and a positive value for an income.',
        meta: {
            user: data.user.id,
            action: '?/update',
            id,
            label,
            amount,
            categories
        }
    } satisfies ModalSettings);

    const toastStore = getToastStore();
    const successfullyDeletedToast = (label: string) => ({
        message: `The expense "${label}" was deleted successfully.`,
        background: 'variant-filled-success',
    } satisfies ToastSettings);
    const failureToast = {
        message: 'Something went wrong. Please try again.',
        background: 'variant-filled-error',
    }

    let editExpenses: boolean = false;
</script>
Inside the UI, we will create a grid with two columns, and in the right column, we will create a list of all expenses. This means we create a card with the category icon, the expense label, and the amount with currency. If we enable the edit mode, we also enable the user to edit or delete an expense by adding two buttons on the right of the expense.
The edit button opens the addExpenseModal, and the delete button performs the delete form action.
At the bottom of the right side, we have two buttons to add and edit the expenses. If the edit mode is enabled, it is only the edit button, now called cancel, so that the user can toggle again.
<div class="grid grid-cols-5 h-full max-h-full">
    <div class="col-span-2"></div>
    <div class="col-span-3 border-l border-surface-900-50-token p-6 flex flex-col gap-8 h-full">
        <ul class="list w-full p-2 overflow-y-auto flex-[1_1_0]">
            {#each data.expenses as expense}
                <li class="flex">
                    <div class="flex-1 flex items-center p-4 card card-hover gap-4 rounded-token">
                        <span
                            ><img src={expense.expand?.category.icon} alt="category icon" class="w-8 h-8" /></span
                        >
                        <span class="flex-auto">{expense.label}</span>
                        <span
                            class={expense.expense && expense.expense >= 0 ? 'text-success-500' : 'text-error-500'}
                            >{expense.expense} {expense.currency}</span
                        >
                    </div>
                    {#if editExpenses}
                    <button type="button" class="btn-icon variant-filled-primary" on:click={() => modalStore.trigger(updateExpenseModal(expense.id, expense.label, expense.expense))}>
                        <svg xmlns="http://www.w3.org/2000/svg" fill="none" viewBox="0 0 24 24" stroke-width="1.5" stroke="currentColor" class="w-5 h-5">
                            <path stroke-linecap="round" stroke-linejoin="round" d="m16.862 4.487 1.687-1.688a1.875 1.875 0 1 1 2.652 2.652L10.582 16.07a4.5 4.5 0 0 1-1.897 1.13L6 18l.8-2.685a4.5 4.5 0 0 1 1.13-1.897l8.932-8.931Zm0 0L19.5 7.125M18 14v4.75A2.25 2.25 0 0 1 15.75 21H5.25A2.25 2.25 0 0 1 3 18.75V8.25A2.25 2.25 0 0 1 5.25 6H10" />
                          </svg>
                    </button>
                    <form action="?/delete" method="POST" use:enhance={() => {
                        return async ({ result, update }) => {
                            if (result.type === 'success') {
                                toastStore.trigger(successfullyDeletedToast(expense.label));
                            } else {
                                toastStore.trigger(failureToast);
                            }
                            update();
                        }
                    }}>
                        <input type="hidden" name="id" value={expense.id} />
                        <button type="submit" class="btn-icon variant-filled-error">
                            <svg xmlns="http://www.w3.org/2000/svg" fill="none" viewBox="0 0 24 24" stroke-width="1.5" stroke="currentColor" class="w-5 h-5">
                                <path stroke-linecap="round" stroke-linejoin="round" d="m14.74 9-.346 9m-4.788 0L9.26 9m9.968-3.21c.342.052.682.107 1.022.166m-1.022-.165L18.16 19.673a2.25 2.25 0 0 1-2.244 2.077H8.084a2.25 2.25 0 0 1-2.244-2.077L4.772 5.79m14.456 0a48.108 48.108 0 0 0-3.478-.397m-12 .562c.34-.059.68-.114 1.022-.165m0 0a48.11 48.11 0 0 1 3.478-.397m7.5 0v-.916c0-1.18-.91-2.164-2.09-2.201a51.964 51.964 0 0 0-3.32 0c-1.18.037-2.09 1.022-2.09 2.201v.916m7.5 0a48.667 48.667 0 0 0-7.5 0" />
                              </svg>
                        </button>
                    </form>
                    {/if}
                </li>
            {/each}
        </ul>

        <div class="flex gap-8 w-full">
            {#if !editExpenses}
            <button class="btn variant-filled flex-1" on:click={() => modalStore.trigger(addExpenseModal)}>
                Add expense
            </button>
            {/if}
            <button class="btn variant-filled flex-1" on:click={() => editExpenses = !editExpenses}>{!editExpenses ? "Edit expenses" : "Cancel"}</button>
        </div>
    </div>
</div>
With that, we have the logic to display, create, update, and delete entries from our SvelteKit frontend inside of our Pocketbase backend.
You can also access the current state of the project in this repository and the branch called “course-6”.
Conclusion
In this post, you learned how to use modals and toast notifications in Skeleton UI, and additionally, you built a SvelteKit application that performs Create, Read, Update and Delete (CRUD) actions in our Pocketbase backend. I hope you liked the course so far. See you in the next part!
And as always, if you have any questions… ask! 😀
In case you have any questions, feel free to ask them, and if you want to stay up to date with all my posts, consider subscribing to my monthly newsletter!
[convertkit form=2303042]
Discussion (1)
Related Posts