Create a Docker application with Python easily – Example
Creating a Docker Application with Python has some great benefits, in this post, you will learn why and how you can use it with a simple example.
The example application will count the occurrences of a specified character in a text. We will create an image for the application and see how to use environment variables, commands, etc.
With that… Let’s roll out!
What is Docker and what are the benefits?
Docker is great to share easily your work with other systems.
Imagine two computer systems. On one hand, yours, that is completely set up for your new application, and on the other, the blank system of your friend with whom you want to share your application. You try to install it on his system and run it, but nothing is working. You forgot to install the dependencies and thus the application can not be run.
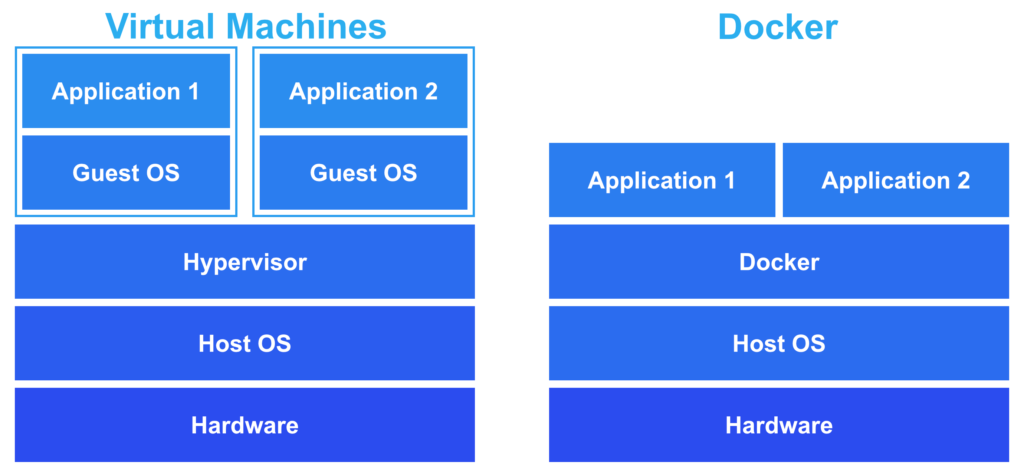
To run the application, you could install all of the dependencies or you could give him a complete system — a Virtual Machine (VM) — with all dependencies installed. Unfortunately, virtual machines are pretty bulky and slow, because they virtualize the hardware and run their own operating system.
Docker containers are similar in context, but they have one key difference. Unlike a VM, containers do not virtualize the hardware and thus are slim and fast.
If this guide is helpful to you and you like what I do, please support me with a coffee!
Three concepts – Dockerfiles, Images and Containers
The concept to start with is images. An image is a snapshot of the current application and it includes all the needed dependencies. As a result, new containers can use the image to run the application with all the necessary data.
To create a new image you need a Dockerfile. It basically tells Docker how to build the image for your containers by defining it step by step like a recipe. Each step expands on the previous step and thus builds a layered system.
In the first step, you have to define the base image for your Dockerfile.
FROM <image>From there you can use all kinds of different actions. For example, with RUN you can run a command during the image creation, this can be useful to install needed dependencies.
RUN <command>As another example, ENV defines an environment variable that is available inside of the container. Thus they are also available when running your application.
ENV <KEY=value>Lastly, CMD defines the default start command for your container. Most of the time this starts an application.
CMD ["command"]The last needed concept is containers. Each container is an instance of an image and can run the application. You can create multiple containers using the same image.
The python application example
To learn the basics, we will transform a simple python example application into a Docker container. It just reads a file and counts the occurrences of a specified character. In the end, it will put out the number in a little text.
import os
import argparse

# set name
name = os.getenv('BOT_NAME') or 'Generic Bot'

# get input parameter
parser=argparse.ArgumentParser()
parser.add_argument("input", help = "Input File Path")
parser.add_argument("character", help = "Character to count")
args = parser.parse_args()

# read specified file
input = (open(args.input, encoding='utf8')).read()

# count occurences
occurences = input.count(args.character)

print('Hello I am {name}!'.format(name=name))
print('Your specified character appears {occurences} time(s)!'.format(occurences=occurences))
In the code you can see, that the variable name either takes the value of the environment variable ‘BOT_NAME’ or it will be ‘Generic Bot’. This line exists to later show you some basics in the Dockerfile.
We can now run the application by specifying the file to read and the character to count by using command line arguments. We define the arguments with the ‘argparse’ module.
In the last step, we write the results of the count into the command line. Now we know how the application works and can transform it into an image.
Create the Dockerfile for the python application example
Now that we have our python example application we will first define a Dockerfile, convert it into an image, and then run it as a Docker container (the three concepts explained before).
We have already learned some of the available actions inside of a Dockerfile. We use these and more to create the image for our application.
The base image for our python application is ‘python’ and we specify it in the FROM action. Then we specify the working directory with WORKDIR, which defines the starting point for all following actions.
After defining the working directory, we copy all needed files into it, by specifying the ‘from’ and the ‘to’ directory inside of the COPY action. The lefthand side is our local machine and the righthand side is inside the working directory of the image.
In the last step, we define a start command to read the text file ‘test.txt’ and count the character ‘n’.
# specify start image
FROM python

# all commands start from this directory
WORKDIR /count-bot

# copy all files from this folder to working directory (ignores files in .dockerignore)
COPY . .

# set a default environment variable for the name of your bot
ENV BOT_NAME='Docker Bot'

# set the start command
CMD [ "python3", "count-bot.py" , "./test.txt", "n"]
To create an image from the Dockerfile we run the appropriate docker command. The parameter -t defines the tag or the name of the image.
docker build -t programonaut/count-bot .The result of this is an image of our example application with the tag ‘programonaut/count-bot’. Let’s see how to use this to create a container, change the input file and the bot name.
Running a Docker container with the python application
In general, there are two main ways to create a Docker container for your application, The first method is to run the default Docker commands and the second one is to use docker-compose and define your container inside a YAML file.
Using the Docker command
To create a container with Docker you have to execute the docker run command and specify the needed properties. We just create a simple container by specifying the name and the image. If you want to have an overview of all the possible properties check here.
docker run --name count-bot programonaut/count-botWith this, we run the container and see the application counting the occurrences of n inside the text file.
Using docker-compose
To use docker-compose you have to create a docker-compose.yml file. In this file, you define the properties of the container. It is really useful because you can exchange the file with a friend and he can build the same containers with one command only.
If you want to know more about docker-compose properties, then check my post with a cheat sheet here.
We define the same container that we created with the docker run command before.
services:
    count-bot:
        container_name: count-bot
        image: programonaut/count-bot
To build a container from the file we have to run the command:
docker-compose up count-botWhen you run the command you can see that it creates the container and prints the number of occurrences inside the text file.
[convertkit form=2649016]
Modifying the container
You now know that you can specify containers in different ways. For the next steps, we will use docker-compose.
First, we will use the environment variable property to change the name of our count bot. As you probably saw, we already changed it from ‘Generic Bot’ to ‘Docker Bot’ by specifying a default value for the environment variable inside the Dockerfile.
To change this with docker-compose we specify the property environment: it is a dictionary and thus we specify the variable by using KEY: value.
    count-bot:
        container_name: count-bot
        image: programonaut/count-bot
        environment:
            BOT_NAME: Bob
After rebuilding the container with docker-compose the bot is called Bob.
Next, we will use a different file to read from. Therefore we have to create volumes. Volumes connect endpoints between the containers and the local filesystem. This is helpful to preserve the data of a container.
In addition to the volume, we override the start command and specify the new input file.
services:
    count-bot:
        container_name: count-bot
        image: programonaut/count-bot
        environment:
            BOT_NAME: Bob
        volumes:
            - ./data:/data
        command: python3 count-bot.py /data/new-test.txt m
Before running the command we should create the new directory ‘data’ and, inside of it, the new file ‘new-test.txt’.
Now we can build the container again and we should see the character occurrences for the new file.
I hope this example was a helpful introduction to how to use docker for your python application. Feel free to leave any questions or feedback in the comment section or shoot me an email at mail@programonaut.com.
Additionally, you can find all the files inside of this GitHub repository.
Discussion (0)
Related Posts