A practical example of Test Driven Development (TDD)
Do you want to learn how to improve the quality of your code with a practical example of test driven development?
Currently, I am learning more about TDD, what it is, when to use it, and how to implement it in my projects. I am always really glad when I use it, but I have to admit that I am not regularly using it in my projects yet.
In my opinion, TDD helps to structure my programming: It forces me to first think about what the code should do before implementing it. In this way, it reduces bugs and other problems. So, overall I think that TDD improves the workflow and results of my programming.
The first time I heard about TDD was at university in the course “Software Engineering”. We had to use it inside of a project immediately. At first, I did not understand the idea behind it, but I got it by using it inside of the project. Only because of that, I got how useful this process can be.
That’s why I suggest you first read the blog post, participate in the practical example and then implement test driven development in a small-scale project yourself.
In this post, we will tackle the following subjects:
- What is Test Driven Development?
- Why you should use Test Driven Development
- Set up Jest to run our Tests
- A practical example of Test Driven Development
With that… Let’s roll out!
If this guide is helpful to you and you like what I do, please support me with a coffee!
What is Test Driven Development?
In short, Test Driven Development is a process where you first create a test and then run the tests repeatedly while programming the function.
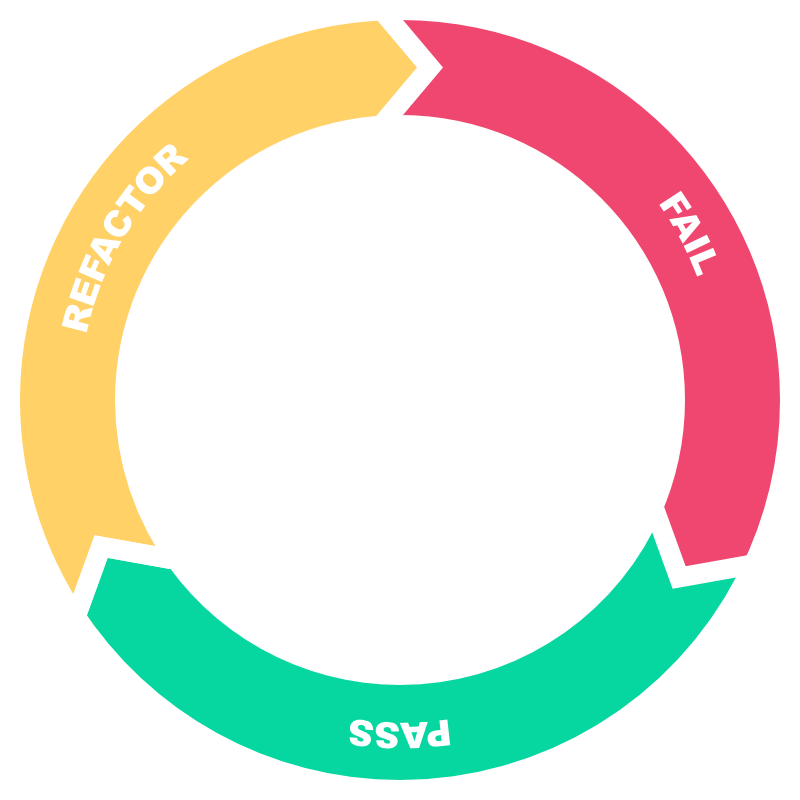
You can break this process down into 5 steps:
- Add a new test
- Run all tests and see the new one failing
- Write the simplest code that passes the test
- Run all tests and see all of them passing
- Refactor the code if needed (run all tests after a refactor to ensure it is still working)
Or simpler in the three steps seen in the graphic. First, you write the failing test, then you make it pass, and in the end, you refactor the written function.
A real-life example: imagine you want to buy a new bike. First, you check the price online and realize that you do not have enough money (fail). So you work hard until you got the money, then go to a shop and buy it (pass).
After some time, you want to buy another bike and try to find a more efficient way to earn the money needed(refactor).
As you can see, the most important principle is to first write the test before implementing the function. It guarantees that you write your application for testability while ensuring the effectiveness of your test code and the quality of your software. However, keep in mind that your first test might not even compile at first—the reason being that the required methods and classes don’t even exist yet.
While writing tests, you should always try to keep them as small as possible. Small tests help with readability and thus are easier to understand. Additionally, it is more manageable to track down errors while debugging in case a test does not pass.
The different types of testing
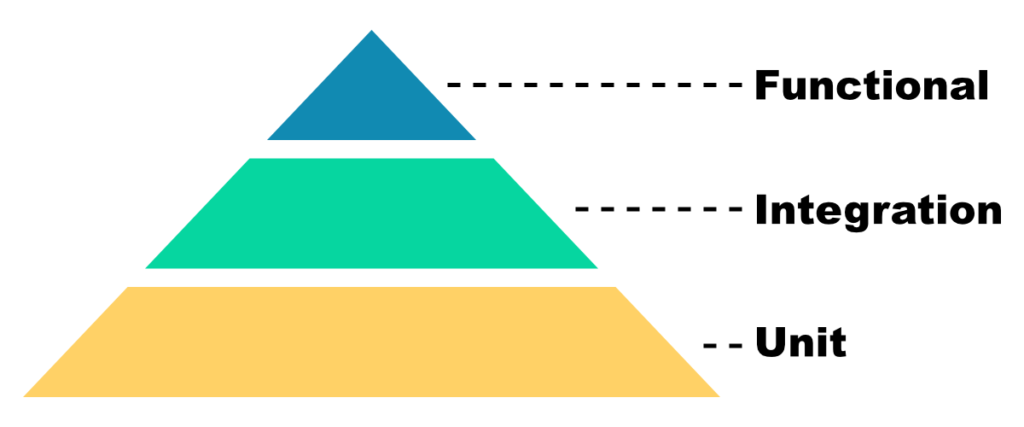
As shown in the graphic above, there are three main types of tests, where each covers a different layer. Unit tests cover functions, methods, or just units of code. Integration Tests examine multiple units working together. For example, testing the complete sign-up process in a web app. Finally, functional Testing instead covers End-to-End testing. This type of testing is often done by tools that try to emulate user interaction.
Why you should use Test Driven Development
Now that we know what TDD is and the different testing possibilities, we will learn about the benefits.
The most important benefit, in my opinion, is the overall higher quality of your code: it does not only improve the maintainability of your code, but it also reduces the number of bugs coming out of “nowhere”. I experienced that it is really time-consuming if a newly implemented feature breaks something else, and you have no idea where the new problems come from.
TDD also enables you to extend your code in smaller steps. You only have to think about one task: Making this new function work!
Summarized TDD is one of the best ways to level up your programming, and additionally, it gives you a nice feeling when you see a test go from red to pass!
Let’s program a practical example of test driven development!
Set up Jest to run our Test
For this example, we will use JavaScript with the Jest package. Therefore, we will first set it up step by step.
Install Jest:
npm install jestJest will run all files ending with .test.js automatically. To store these files, we create a directory called “tests” in our project.
Additionally, we define a new test command inside of the “package.json”. This command runs Jest and then keeps an eye on all files. If a file changes, it runs all tests.
jest --watchAll --verbose We additionally install IntelliSense to make working with Jest easier. Therefore we first install the Jest types with npm:
npm install @types/jest --save-devThere is one more step left to enable autocomplete. We need to create a jsconfig.json with the following content:
{
	"typeAcquisition": {
		"include": [
			"jest"
		]
	}
}
With that, we installed Jest, and we can start with the example!
A practical example of Test Driven Development
For this, we will create a function that removes every second element of an array. To conform with TDD, we will run our test command with:
npm run testand then start by creating our first tests in the index.test.js file. But before writing the tests themselves, we will mark them as a Todo because sometimes it is useful not to implement all tests at once.
describe('My array', () => {

    it.todo('removes every second element');

    it.todo('keeps every first element');

});
After saving the file, Jest will tell us that our test suite is ready and that we have two more todos left.
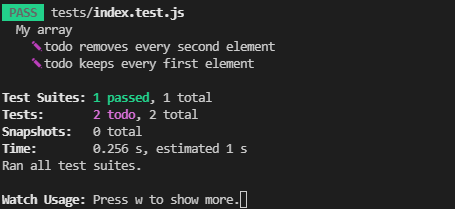
Fail
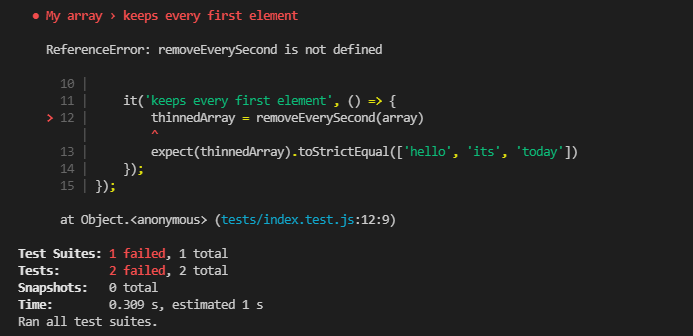
Now we will implement the tests. Therefore initially, we create a simple array and then add expect statements inside the tests after executing the function we want to test.
describe('My array', () => {
    let array = ['hello', 'world', 'its', 'dark', 'today']

    it('removes every second element', () => {
        thinnedArray = removeEverySecond(array)
        // toStrictEqual is needed because of deep equality in arrays
        expect(thinnedArray).toStrictEqual(['hello', 'its', 'today'])
    });

    it('keeps every first element', () => {
        thinnedArray = removeEverySecond(array)
        expect(thinnedArray).toStrictEqual(['hello', 'its', 'today'])
    });
});
As a result, we will get two failing tests because the function does not exist yet.
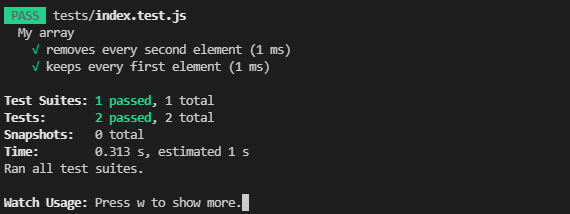
Pass
Now we implement the simplest function that we can think of that solves the problem.
function removeEverySecond(array) {
    let newArray = []

    for (let i = 0; i < array.length; i++) {
        if((i + 1) % 2 == 1){
            newArray.push(array[i]);
        }
    }

    return newArray
}

exports.removeEverySecond = removeEverySecond;
After saving, our tests still fail because we did not import the function yet.
const { removeEverySecond } = require( '../index.js')With that done, all our tests pass!
Refactor
Now we can refactor our function to be more efficient.
function removeEverySecond(array) {
    return array.filter((_, i) => (i + 1) % 2 == 1);
}
Because both tests still pass, we successfully implemented a more efficient function that did not break anything.
You can find the source code for this example on my GitHub.
Conclusion
Summarized, test driven development consists of three steps:
- fail
- pass
- refactor
With these steps, we can improve the overall quality of our code and make it more extensible and easier to read.
I hope you enjoyed reading this introduction into test driven development. Feel free to leave any questions or feedback in the comments below or email me at mail@programonaut.com.
Discussion (0)
Related Posts