A Basic Introduction To Prisma ORM
Do you want to know what Prisma ORM is and how you can use it in your projects? In this basic introduction to Prisma ORM, we will check exactly that. Starting with a general overview and then diving into a basic example!
- Prisma General
- Prisma Data Model with PostgreSQL Basics
- Prisma Migrate Introduction
- A basic introduction to Prisma Querying
- Conclusion
Prisma General
Prisma is an open-source ORM. ORM means object-relational mapping, and it is a technique to create objects from your application inside a relational database. Prisma can be used in any Node or TypeScript backend application, for example, to build a REST API, GaphQL API, etc.
Prisma consists of three parts, the Prisma client is an auto-generated and type-safe query builder, Prisma migrate is the migration system, and Prisma studio is a GUI to view and edit data inside the database. Prisma Studio is not open source and thus is not covered in this post.
All starts with a Prisma schema file, which allows the definition of the models needed for the application using Prisma’s own data modeling language. Besides this, it also contains a connection to the database. The following code snippets configure the main three properties needed:
- Data source: Specifies your database connection
- Generator: Indicates that you want to generate Prisma Client
- Data model: Defines your application models
datasource db {
  provider = "postgresql"
  url      = env("DATABASE_URL")
}

generator client {
  provider = "prisma-client-js"
}

model Model {
  id          Int     @id @default(autoincrement())
  description String
}
Prisma Data Model with PostgreSQL Basics
For the following sections I will use a PostgreSQL database to show some of the options you have with Prisma. For the best experience I suggest you to set up one using Docker. As in this guide here.
Before we create our data model, we will set up a base project by running the following steps:
- Create directory:
mkdir prisma-example && cd prisma-example - Init a new project:
pnpm init - Install typescript:
pnpm install typescript ts-node @types/node --save-dev - Install Prisma:
pnpm install prisma --save-dev - Initialize Prisma:
npx prisma init --datasource-provider postgresql - Adjust the connection string inside
.env
With this, we have an empty project set up, and we have a schema.prisma file inside the prisma directory.
If this guide is helpful to you and you like what I do, please support me with a coffee!
Now the data model can either be generated by reading it out from an existing database or by manually creating it. When it is manually created, it can be transferred to the database using Prisma Migrate.
We will start with the second option and generate the following Prisma data model:
model Post {
id Int @id @default(autoincrement())
title String
content String?
published Boolean @default(false)
author User? @relation(fields: [authorId], references: [id])
authorId Int?
}
model User {
id Int @id @default(autoincrement())
email String @unique
name String?
posts Post[]
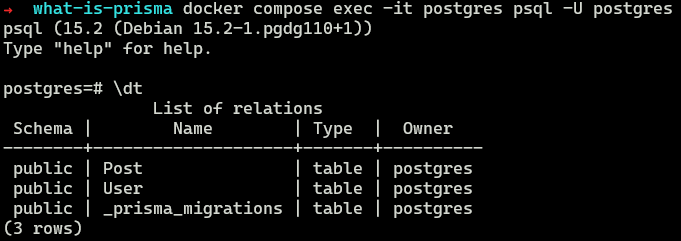
}And write it to the database using Prisma migrate with the following command:
npx prisma migrate dev --name initThis creates a migration file inside the prisma/migrations directory, and the specified tables as visible in the following image.
For the first option, we will delete the migrations folder, remove the models from the Prisma schema file and remove the migrations from the database. We can now generate the data model using the active database by running the following:
npx prisma db pullIf we now check our file, we see that the same data model is back.
Prisma Migrate Introduction
In the next step, we now change the schema file and then write this to the database. Before we do this, we run the migrate diff command to create the starting point of our migration history. To do this, we have to create the first migration directory manually, get the diff and then accept this as our starting point:
mkdir -p prisma/migrations/0_init
npx prisma migrate diff --from-empty --to-schema-datamodel prisma/schema.prisma --script > prisma/migrations/0_init/migration.sql
npx prisma migrate resolve --applied 0_init
Now that we have the first migration let’s change something inside the schema file and create a new migration. For this example, I will add a new property called category with the String datatype to the post model:
model Post {
  id        Int     @id @default(autoincrement())
  title     String
  content   String?
  published Boolean @default(false)
  author    User?   @relation(fields: [authorId], references: [id])
  authorId  Int?
  category  String?
}
We can now create a migration using the following:
npx prisma migrate dev --name add-category-to-postA basic introduction to Prisma Querying
Inside our project, we will first populate the database with a user and a post and then query the data using the following code:
import { PrismaClient } from '@prisma/client'
import util from 'util'

const prisma = new PrismaClient()

async function main() {
    // create two users with two posts each
    const user = await prisma.user.create({
        data: {
            name: 'Max',
            email: 'mail@programonaut.com',
            Post: {create: {title: 'What is Prisma?'}},
        },
    })

    const users = await prisma.user.findMany({
        include: {
            Post: true,
        },
    })

    const postsOfMax = await prisma.post.findMany({
        where: {
            author: {
                name: 'Max',
            }
        }
    })

    console.log('All users:', util.inspect(users, false, null, true));
    console.log('All posts of Max:', util.inspect(postsOfMax, false, null, true));
}

main()
With this, we first query all users with their blog posts and then all blog posts of the author with the name Max. To do so, we first create the Prisma client and then can use the type safety to query the data.
These are the basics you need to know to get started! To learn more, head over to the Prisma documentation, from where I got most of my information as well.
Conclusion
In this basic introduction, you learned how to use Prisma by generating the schema from an existing database, using migrations, and querying the database inside the application. I hope this overview was helpful to you!
If you like my content, consider subscribing to my newsletter to get monthly updates!
[convertkit form=2303042]
Discussion (0)
Related Posts