What is Skeleton UI – A Quick Introduction
Do you want to know what Skeleton UI is and how it can increase your development speed? In this quick introduction, we’ll walk you through installing Skeleton and creating a basic UI.
What is Skeleton UI
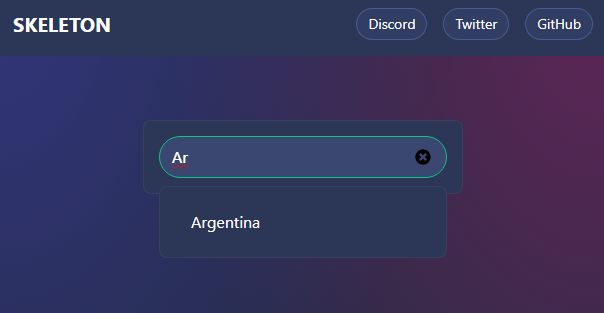
Skeleton UI is a fully-featured UI toolkit for building reactive interfaces quickly using Svelte and Tailwind CSS. It utilizes Tailwind’s utility classes and design system capabilities to quickly and easily create beautiful interfaces. In the following sections, we will install it and then build this example:
How to install Skeleton UI
To install Skeleton, we will use the Skeleton CLI for creating a new Skeleton project. This will automatically scaffold a new SvelteKit application, install Tailwind, configure Skeleton, and more. You can install it by running the following command in your terminal:
pnpm create skeleton-app@latest example-uiChoose:
- Skeleton app template
- Skeleton theme
- Add Popups
- TypeScript
- Optional
Create a basic UI with Skeleton
After installing Skeleton, you can create a basic UI by following these steps:
- Open your terminal and navigate to the project directory.
- Install the packages:
pnpm install - Open the file
+page.sveltein your code editor. - Add the following code to the file:
<script lang="ts">
    import { Autocomplete, popup, type AutocompleteOption, type PopupSettings } from "@skeletonlabs/skeleton";

    let input = '';
    const countryOptions: AutocompleteOption<string>[] = [
        { value: 'Argentina', label: 'Argentina' },
        { value: 'Bolivia', label: 'Bolivia' },
        { value: 'Brazil', label: 'Brazil' },
    ];

    function onCountrySelection(event: CustomEvent<AutocompleteOption<string>>): void {
        input = event.detail.label;
    }

    let popupSettings: PopupSettings = {
        event: 'focus-click',
        target: 'popupAutocomplete',
        placement: 'bottom',
    };
</script>

<div class="container card w-80 mx-auto p-4 my-16">
    <input
        class="input autocomplete"
        type="search"
        name="autocomplete-search"
        bind:value={input}
        placeholder="Search..."
        use:popup={popupSettings}
    />
    <div data-popup="popupAutocomplete" class="card w-72 max-h-48 p-4 overflow-y-auto">
        <Autocomplete
            bind:input={input}
            options={countryOptions}
            on:selection={onCountrySelection}
        />
    </div>
</div>- Save the file and run the following command in your terminal:
pnpm run dev- Open your browser and navigate to
http://localhost:5173. You should see a basic UI with an autocomplete search box.
Conclusion
In summary, Skeleton UI is a powerful UI toolkit built using Svelte and Tailwind CSS that allows you to create adaptive, accessible design systems for your web apps. To get started with Skeleton, use the Skeleton CLI for creating new projects. Once installed, you can easily create beautiful interfaces by following the steps outlined in this introduction to Skeleton UI.
Need help or want to share feedback? Join my discord community!
I hope this short post was helpful! Let me know if you have any other questions.
If you want to keep up to date with my latest posts subscribe to my newsletter!
[convertkit form=2303042]

If this guide is helpful to you and you like what I do, please support me with a coffee!
