Meta Tags in HTML: Create powerful previews of your content!
Do you want to bring the Google preview of your site to the next level? This post will provide you with the tools to create amazing previews by teaching you how to use Meta Tags in HTML!
We will first cover the basics of Meta Tags, then see the basic way of doing them, and lastly, how to bring it to the next level!
A short description of Meta Tags
Meta Tags are not content on your page. Instead, they are a way to inform the user about the content of your page. That means it will not show up on your page itself, but it will show up in the google preview of your site.
The Meta Tags could be the title of your page and a short description. For example, here you can see this for one of my blog posts (you can find it here):

Google uses Meta Tags and to give the user a preview of the content. Thus they are important to improve the probability that the user decides to click on your site and not the one of a competitor!
How to use Meta Tags in HTML?
Meta Tags can be used in different ways because there are two different types of Meta Tags. First, what are these types?
The standard type includes the title and a short description, as shown in the example above. And then there is the Schema.org type. With this, you are allowed to present anything. For example, a list of important elements or the rating of a product!
If this guide is helpful to you and you like what I do, please support me with a coffee!
You can create the first type inside the HTML head by defining the available Meta Tags. For example, the title and description of the previous example:
<head>
<title>The most important Docker Compose properties</title>
<meta name="description" content="This post offers a simple overview of the most important docker-compose properties! There is also a cheat sheet for download included!">
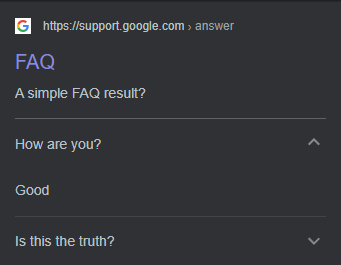
</head>For the second type, this is a bit harder because you have multiple ways. The first way is to add microdata inside of the HTML and define with that what to display. One example is a FAQ based on the appropriate Schema.org type:
<html itemscope itemtype="https://schema.org/FAQPage">
    <body>
        <div itemscope itemprop="mainEntity" itemtype="https://schema.org/Question">
            <h2 itemprop="name">How are you?</h2>
            <div itemscope itemprop="acceptedAnswer" itemtype="https://schema.org/Answer">
                <div itemprop="text">Good</div>
            </div>
        </div>
        <div itemscope itemprop="mainEntity" itemtype="https://schema.org/Question">
            <h2 itemprop="name">Is this the truth?</h2>
            <div itemscope itemprop="acceptedAnswer" itemtype="https://schema.org/Answer">
                <div itemprop="text">Yes</div>
            </div>
        </div>
    </body>
</html>
But this is pretty tedious work, and there is a simpler solution used most of the time. This method includes JSON-LD (JSON Linked Data), and you have to define the elements you want to display inside it.
In this method, it is important that you only use content that exists on your page and that you are not adding any stuff that does not exist. If you do it, it will hurt you because:
Google decides if it will use your meta information or not.
That means that although you define the Meta Tags, Google does not have to use them, and this is the case for both types.
Now, let us continue with the JSON-LD. To include it inside the HTML, you have to define a script element inside the head with the type ld+json. The script tags will look like this:
<script type="application/ld+json">
    ...
</script>
And for the previous faq example, this JSON would look like this:
{
  "@context": "https://schema.org/",
  "@type": "FAQPage",
  "mainEntity": [
    {
      "@type": "Question",
      "name": "How are you?",
      "acceptedAnswer": {
        "@type": "Answer",
        "text": "Good"
      }
    },
    {
      "@type": "Question",
      "name": "Is this the truth?",
      "acceptedAnswer": {
        "@type": "Answer",
        "text": "Yes!"
      }
    }
  ]
}
Afterward you can also set a title and description for the FAQ inside of the head with the appropriate tags:
- <title>
- <meta name=”description” content=”content”>
Lastly, after you created the JSON and other information, you can validate and preview it with this tool from Google. The result can be seen with the rich result test:
What are the Meta Tags?
The first type is defined inside of the head tags:
- title: Defines the tilte of your page (in google and also in the tab bar)
<title>Example Title</title>- description: Defines the description of the page
<meta name="description" content="An example description">The second type has more than 600 possible, and thus I will show you only 3 of them that I think are some of the more important ones for you:
- How To:
{
    "@context": "https://schema.org",
    "@type": "HowTo",
    "name": "How to name",
    "image": {
      "@type": "ImageObject",
      "url": "image-url",

    },

    "supply": [
      {
        "@type": "HowToSupply",
        "name": "supply"
      }
    ],
    "tool": [
      {
        "@type": "HowToTool",
        "name": "tool"
      }
    ],
    "step": [
      {
        "@type": "HowToStep",
        "url": "https://example.com/kitchen#step1",
        "name": "Step name",
        "itemListElement": [{
          "@type": "HowToDirection",
          "text": "step instruction"
        }],
        "image": {
          "@type": "ImageObject",
          "url": "iamage-url",

        }
      },
    ],
    "totalTime": "P2D"
}- Software Application:
{
    "@context": "https://schema.org",
    "@type": "SoftwareApplication",
    "name": "Mobile App Name",
    "operatingSystem": "ANDROID",
    "applicationCategory": "GameApplication",
    "aggregateRating": {
      "@type": "AggregateRating",
      "ratingValue": "3.5",
      "ratingCount": "1000"
    },
    "offers": {
      "@type": "Offer",
      "price": "10.00",
      "priceCurrency": "USD"
    }
}- Blog:
{
    "@context": "https://schema.org",
    "@type": "BlogPosting",
    "headline": "Post headline",
    "description": "description",
    "image": "image-url",
    "datePublished": "2000-01-01T08:00:00+08:00",
    "author": [
     {
        "@type": "Person",
        "name": "Max Mustermann",
        "url": "image-url"
      }
    ]
}
You can find more example here.
Conclusion
In this blog post, we learned how you can use Meta Tags in HTML to give the user a better preview of what your content is about!
We first discussed the basic Meta Tags, including title and description, and then switched to the provided schemas of Schema.org.
I hope this post was helpful for you, and you are now able to create awesome previews of your content! In case you are interested in more Web Development related posts, consider subscribing to my newsletter!
[convertkit form=2303042]
Discussion (0)
Related Posts