Learn How to Build a Multiplayer Tic Tac Toe (2)
You want to build a web-based multiplayer game with multiple clients and basic HTML, CSS, and js? In this post, we will learn how to create the client-side of our multiplayer tic tac toe game!
We will have a look at the frontend creation after building the backend in the last part by first looking at the multiplayer game itself and the different actions that can happen for the server. We will do the same thing again, but this time for the client-side. You can find the whole project on GitHub.
Here is a little preview of the final result with the backend and the frontend working together.
Let’s start building the client side of the tic tac toe game!
Steps
To build the front end we will have another look at the steps in a basic game of tic tac toe. From there we will decide how to structure the code and build the application. Before all of this, we will start by creating the needed HTML and CSS for the UI.
- Client-Server model
- Set up the project
- Create the UI
- Steps in a match of tic tac toe
- Implement the client logic
Client-Server model
In a multiplayer game, there are often a server and multiple clients involved. The server runs the logic and connects the different players with each other. The clients are the players and they send different actions to the server.
In the game of tic tac toe, we have the clients playing the game. Each turn a player selects a free cell to set his mark. Before placing it, the client-side checks if the cell is free and then sends the data to the server-side.
If this guide is helpful to you and you like what I do, please support me with a coffee!
Set up the project
We will create a completely new folder for the front end of our application. It will only contain the necessary components for this part of the project. In the root directory, we will create three folders. Each of the folders has specific content, the css folder contains the style.css, the js folder contains the socket.js and the asset folder contains the cross.png and circle.png to represent the players. Additionally to the folders, we create a file called index.html containing the HTML for the UI.
As you may remember, in the last post, we decided to use socket.io for the backend handling. With this in mind, we also have to use the socket.io library for the frontend. This is pretty simple, we do not have to install anything, we are able to import the needed scripts via a content delivery network or short CDN. The import will simply be placed in the body section of our HTML. In the HTML we also import the CSS to style the UI.
<!DOCTYPE html>
<html lang="en">
<head>
    <meta charset="UTF-8">
    <meta http-equiv="X-UA-Compatible" content="IE=edge">
    <meta name="viewport" content="width=device-width, initial-scale=1.0">
    <title>Multiplayer Tic Tac Toe</title>
    <link rel="stylesheet" href="css/style.css">
</head>
<body>
    <script src="https://cdnjs.cloudflare.com/ajax/libs/socket.io/4.1.2/socket.io.min.js"></script>
    <script src="./js/socket.js"></script>
</body>
</html>
Create the UI
For the UI we need the tic tac toe field, consisting of 9 interactive cells, a way to display the current player and the winner of the game. We will incrementally build up the different components and start with the most important one, the field.
<div class="center-container">
    <div id="tic-tac-toe-grid">
        <button id="x0y0" onclick="turn(0,0)"></button>
        <button id="x1y0" onclick="turn(1,0)"></button>
        <button id="x2y0" onclick="turn(2,0)"></button>
        <button id="x0y1" onclick="turn(0,1)"></button>
        <button id="x1y1" onclick="turn(1,1)"></button>
        <button id="x2y1" onclick="turn(2,1)"></button>
        <button id="x0y2" onclick="turn(0,2)"></button>
        <button id="x1y2" onclick="turn(1,2)"></button>
        <button id="x2y2" onclick="turn(2,2)"></button>
    </div>
</div>
All fields are part of the tic-tac-toe-grid container and consist of an id representing their position and a function to execute on click. This function will hold the functionality to play a turn. The style of the field is represented by the following CSS:
.center-container {
align-self: center;
}
#tic-tac-toe-grid {
display: grid;
grid-template-columns: repeat(3, 150px);
grid-template-rows: repeat(3, 150px);
gap: 3px;
background-color: #fdfffc;
}
#tic-tac-toe-grid button {
border: none;
background-color: #011627;
border-radius: 0;
background-image: unset;
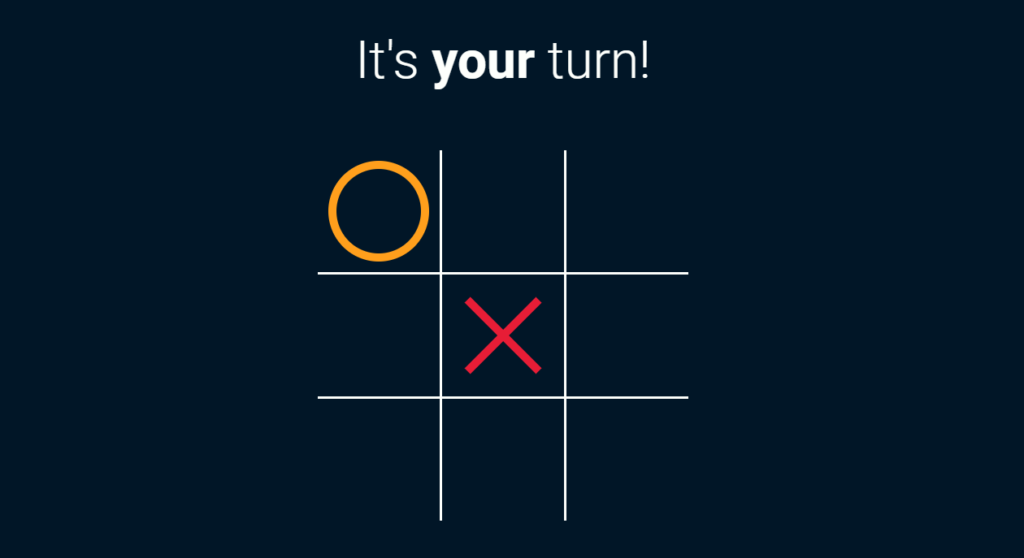
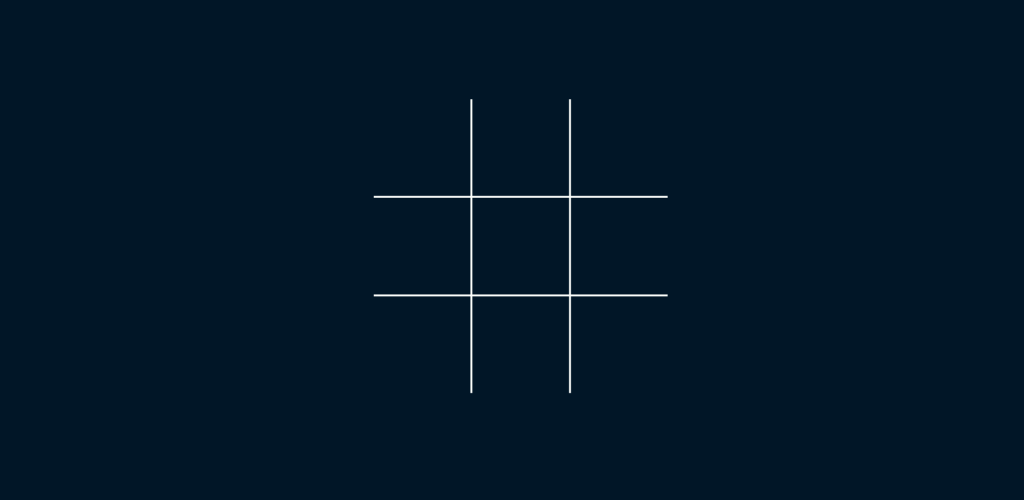
}With these two main styles, we create the tic tac toe field. First, we create a container with the line colors and then apply the background color of the page to the buttons to remove them from the container. With that we get the following field:
The next step is to add a container holding the text to display the current player and a weighted container to balance the flex of the body.
<div class="text-container">
<p id="current-turn" class="hide">It's <b><span id="clientId"></span></b> turn!</p>
</div>
<div class="center-container">
...
<div class="weight-container"></div>
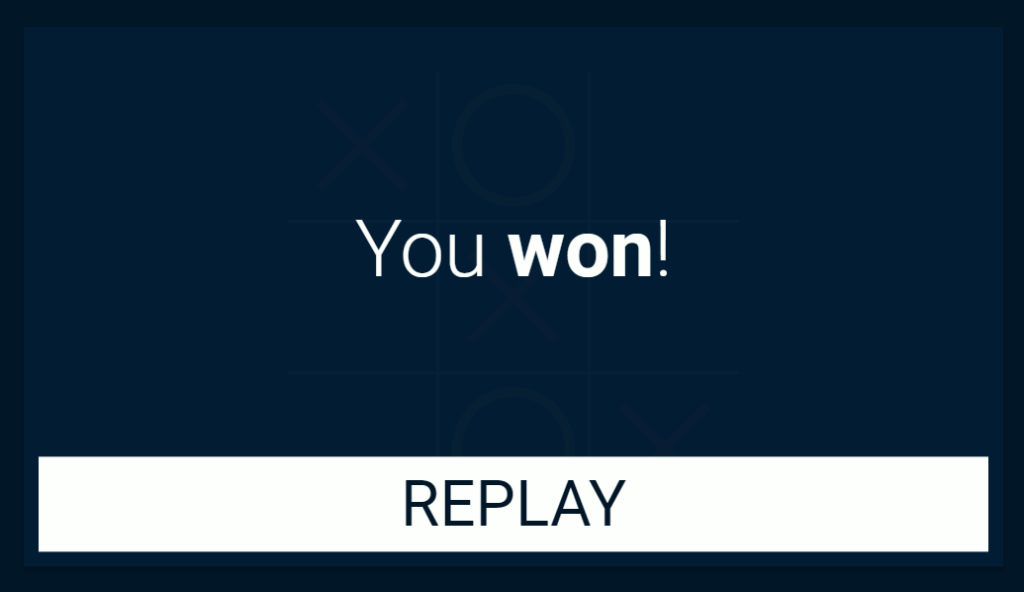
</div>As a last point for the UI we want a popup to display the winner of the game and to give the players the option to play another round. The pop up is hidden with the hide class in the beginning of a match and will be shown by removing the hide as part of the client side logic.
<div id="popup" class="hide">
    <div class="winner-container">
        <span>You <b><span id="winnerId"></span></b>!</span>
    </div>
    <button id="replay" onclick="restart()">REPLAY</button>
</div>
With the right styling this will result in the following popup.
I did not show the creation of the CSS in most of the steps. You can either create your own design or take the one stored in my GitHub.
Steps in a match of tic tac toe
We described the different steps already in the last part, so I will not go into detail here. For the client, the most important steps are receiving the id by the server, the start, and the finish events as well as the playing of the game. With this in mind, we can also create a list of the needed events for the client.
Send (step)
- turn (3)
Recieve (step)
- clientId (1)
- start (2)
- continue (x)
- turn (3)
- over (4)
Implement the client logic
With the UI in place and an overview of the different steps, we can start our backend server (node {folder-name/index.js}) and begin with the development of the client-side logic. To do this we will open the index.html file in the browser and then enter our socket.js file to get started with the logic.
In the first step, we will connect to our local backend server and define some helpful variables to use in the logic. The first one is an overview of the different player tokens, the player id, and the currently active player.
const socket = io("ws://localhost:3000");
const token = {
    1: "cross",
    2: "circle"
};
let clientId;
let activeId;
With this in place, we can set up the listeners for the different events sent out by the server.
// get client id
socket.on('clientId', (id) => {
...
})

// get the first active player id and set up html for game
socket.on('start', (startId) => {
...
});

// get the active player and get field state
socket.on('continue', (active, field) => {
...
})

// update field with turn information
socket.on('turn', (turn) => {
...
})

// show popup with win information
socket.on('over', (overObj) => {
...
})
We will go over them step by step and fill them with the needed logic. In the first event, we will get our id from the server. This id will be used to determine the player’s token and also to display the currently active player. When we get this from the server we assign it to the clientId.
socket.on('clientId', (id) => {
   clientId = id;
})
The next event signals the start of the match and also tells the clients who will begin. With this, we will start showing the currently active player and also assign the activeId variable.
socket.on('start', (startId) => {
    activeId = startId;

    document.getElementById('current-turn').classList.remove('hide');
    document.getElementById('clientId').innerHTML =
     clientId == activeId ? 'your' : 'not your';
});
In connection to the start event, we have the continue event that performs the same tasks. The only difference is that it will also receive the current state of the game and inserts this state into the field.
socket.on('continue', (active, field) => {
    activeId = active;
    for (let x = 0; x < field.length; x++) {
        for (let y = 0; y < field.length; y++) {
            setField(x, y, field[y][x]);
        }
    }

    document.getElementById('current-turn').classList.remove('hide');
    document.getElementById('clientId').innerHTML =
     clientId == activeId ? 'your' : 'not your';
})
In this part, the first helper function is used. The helper function setField(x,y) takes the coordinates and builds the cell id. In the end, it returns the cell with the fitting id.
// update css for field
function setField(x, y, id) {
    let field = getField(x,y);
    field.classList.add(`${token[id]}`);
}
After continuing or starting to play the game you will either play your turn or receive the opponent’s turn. While playing your turn, you execute the turn function that takes the coordinates and then sends an event to the server. But before sending any event it checks if the field is used or not and if it is currently your turn.
// send turn event to server
function turn(x, y) {
    if (activeId != clientId) return;
    if (getField(x,y).classList.contains(token[1])
    || getField(x,y).classList.contains(token[2])) return;
    console.log('send')
    socket.emit("turn", {
        "x": x,
        "y": y
    })
}
To check if a field is already used, the function checks if the button already contains a class representing a player token. If this is the case the cell is full. But to use is this functionality we have to create two CSS classes for our two tokens. Both of them take a background Image that displays the player’s element.
.cross {
    background-image: url("../assets/cross.svg");
    background-size: contain;
}

.circle {
    background-image: url("../assets/circle.svg");
    background-size: contain;
}
With a player playing his turn we also need the players to receive the played turn. To do this, we will set the field and update the next active player on receiving the turn event.
socket.on('turn', (turn) => {
    const {x, y, next} = turn;
    setField(x, y, activeId);

    activeId = next;
    document.getElementById('clientId').innerHTML =
     clientId == activeId ? 'your' : 'not your';
})
Now that the players are able to play we only need to show them if the game is over and who won. To do this we will update the text of our popup, show the popup and disconnect the player.
socket.on('over', (overObj) => {
    winnerId = overObj['id']
    if (winnerId != 0)
        document.getElementById('winnerId').innerHTML = clientId == winnerId ? 'won' : 'lost';
    else
        document.getElementById('winnerId').innerHTML = 'draw';

    socket.disconnect();

    document.getElementById('popup').classList.remove('hide');
    document.getElementById('current-turn').classList.add('hide');
})
If the player wants to restart the button will reload the site and the match begins from the beginning.
// restart the game
function restart() {
    window.location.reload();
}
With all of this implemented, we have done everything needed for a simple multiplayer tic tac toe. To play the game you have to start your backend with:
node {backend-folder/index.js}And then open two instances of your index.html. Both of them should connect to the backend and let you play the game. All of the resources used in this game are available on GitHub for you.
If you have any questions or feedback feel free to leave a comment or send me an email at mail@programonaut.com.
The icons in this post are mainly created by Freepik from www.flaticon.com.
Discussion (0)
Related Posts