How to Setup Row Level Security (RLS) in PostgreSQL
Do you want to learn how to set up row-level security (RLS) in PostgreSQL for your multi-tenant application? In this guide, we will do exactly that. We will first learn what RLS, then we will set it up inside a PostgreSQL instance, and then build an example application using it.
Sources for this post are:
- https://www.thenile.dev/blog/multi-tenant-rls
- https://learn.microsoft.com/en-us/azure/cosmos-db/postgresql/concepts-row-level-security
- https://www.postgresql.org/docs/current/ddl-rowsecurity.html
What is Row-Level Security?
RLS is a concept that is helpful in a multi-tenant database, as the data of different tenants can be stored inside one table and isolated based on the tenant owning the data. RLS policies restrict what rows can be accessed by whom on a per-tenant basis, meaning that each tenant has full SQL access to the tables, but the information of other tenants is hidden. In PostgreSQL, RLS is disabled by default and has to be enabled first. As RLS follows a default-deny policy, a new policy has to be specified before any data can be accessed. The policy has to be an expression that returns a boolean for each row. True for visible and false for hidden.
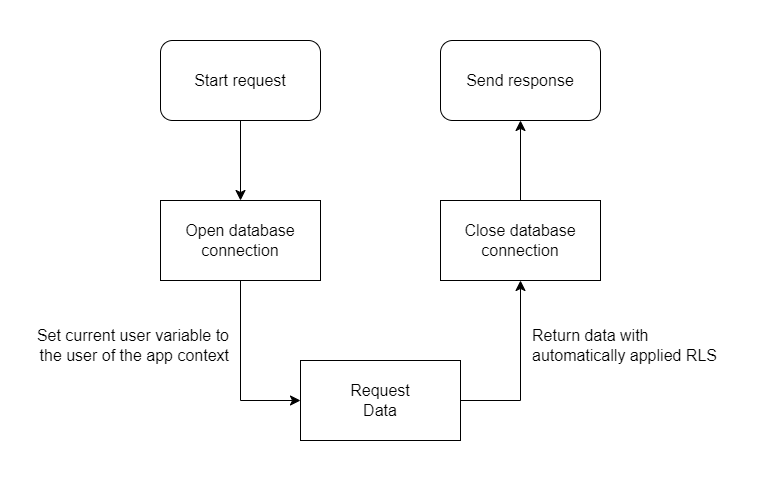
In the scenario of a SaaS, it is a lot of effort to create a dedicated database user for every tenant. Thus it can be useful to implement a dynamic user role based on the tenant accessing the database. For example, in PostgreSQL, this can be implemented by setting a configuration variable during a transaction, as shown in Figure 3.7.
Set Up Row Level Security (RLS) in PostgreSQL
In the following, we will set up row-level security in a PostgreSQL database. For that, we first set up a new instance by creating a new directory called psql-rls and a file called docker-compose.yml with the following content:
services:
postgres:
image: postgres
ports:
- "5432:5432"
environment:
POSTGRES_USER: postgres
POSTGRES_PASSWORD: postgres
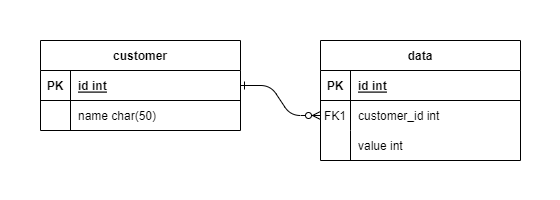
POSTGRES_DB: postgresWe then create an example data schema consisting of two tables. The first one is the customer to create new users dynamically and then data with each data point having a relation to a customer. The following image shows the data schema.
We create the tables with the following SQL script:
CREATE TABLE "customer" (
  "id" SERIAL PRIMARY KEY,
  "name" varchar
);

CREATE TABLE "data" (
  "id" SERIAL PRIMARY KEY,
  "customer_id" integer,
  "value" integer
);

ALTER TABLE "data" ADD FOREIGN KEY ("customer_id") REFERENCES "customer" ("id");
Next up, we will set up RLS for the tables we want to create. Per default, row-level security (RLS) is deactivated. Before we activate it, we will create a new user through which we will from now on access the table. After we created the user and activated the row-level security, we need to create a policy. The policy is a SQL statement returning a Boolean, determining whether a user can access a row or not. For this example, we will say that if customers own the data, they can access it:
If this guide is helpful to you and you like what I do, please support me with a coffee!
create role authenticator noinherit login password 'mysecretpassword';

grant usage on schema public to authenticator;
grant all privileges on customer to authenticator;
grant all privileges on data to authenticator;

ALTER TABLE "customer" ENABLE ROW LEVEL SECURITY;
ALTER TABLE "data" ENABLE ROW LEVEL SECURITY;

CREATE
  FUNCTION current_app_user() RETURNS INTEGER AS $$ SELECT
    NULLIF(
      current_setting(
        'app.current_app_user',
        TRUE
      ),
      ''
    )::INTEGER $$ LANGUAGE SQL SECURITY DEFINER;

CREATE POLICY customer_policy ON customer USING(id = current_app_user());
CREATE POLICY data_policy ON data USING(customer_id = current_app_user());
In the policy, you can see we call the current_app_user function, which is a configuration setting that we need to set to specify the currently active user. You will see how to set that variable in the next part. For now, we have successfully set up row-level security in PostgreSQL.
The following contains some example data you can insert:
INSERT INTO customer VALUES (1, 'customer1');
INSERT INTO customer VALUES (2, 'customer2');

INSERT INTO data VALUES (1, 1, 1);
INSERT INTO data VALUES (2, 1, 2);
INSERT INTO data VALUES (3, 2, 2);
INSERT INTO data VALUES (4, 2, 3);
An example API
As an example of how to use row-level security (RLS) in an application, we will set up a basic API using the pg package and fastify. You can also do something similar with an ORM like Prisma. To learn how to set that up, check this post here.
To get started, we first set up the project:
- Init a new project:
pnpm init - Install typescript:
pnpm install typescript ts-node @types/node --save-dev - Install pg:
pnpm install pg - And the types:
pnpm install @types/pg --save-dev - Install Fastify:
pnpm install fastify
Now we create a new directory called src and inside it, a file called index.ts. The file will have the following code:
import fastify from 'fastify'
import {Client, type ClientConfig} from 'pg'

const server = fastify()

const clientConfig: ClientConfig = {
    connectionString: "http://authenticator:mysecretpassword@localhost:5432/postgres"
}

server.get('/example/:customer_id', async (request, reply) => {
    const { customer_id } = request.params as { customer_id: number };

    const client = new Client(clientConfig);
    let rows: any[] = [];
    try {
        await client.connect()
        await client.query(`SET app.current_app_user = ${customer_id}`)
        rows = (await client.query('SELECT * FROM data')).rows
        await client.query('RESET app.current_app_user')
    } catch (error) {
        console.error(error)
    } finally {
        await client.end()
    }

    reply.send(rows)
})

server.listen({ port: 8080 }, (err, address) => {
  console.log(`Server listening at ${address}`)
})
Inside the endpoint, we first set the variable which customer it is, based on a variable inside the URL. In a production application, this should be done based on HTTP headers or similar. After that, we send our SQL statement and, in the end, reset the variable.
Before we start the application, we have to create a dev script inside package.json:
...
"scripts": {
    "dev": "ts-node src/index.ts"
}
...
If you want to learn how to set up fastify with auto-reload, check this post here.
We can now check http://localhost:8080/example/1 to get all the data of the customer with id = 1.
With that, we have a basic example and see how you can use it inside your own application.
Conclusion
In this guide, we learned what row-level security (RLS) is and how to set it up inside PostgreSQL. After that, we created an example API to see how to use RLS inside your application.
In case you have any questions, feel free to ask me, and if you like this post, consider subscribing to my newsletter.
[convertkit form=2303042]
Discussion (0)
Related Posts